
Instructions / Assembly


-2- 200199-01
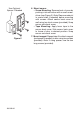
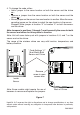
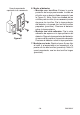
Remove back of case by
pushing in tab on bottom with a small screw-
driver (see Figure 2). See diagram inside sensor
for correct battery orientation. Note: If batteries
are preinstalled, remove orange battery tab.
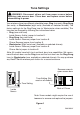
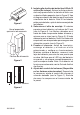
The maximum gap
between sensor and magnet is 1/2" (13 mm)
(see Figure 4). The arrows located on the face
of each component must be aligned and facing
toward each other (see Figure 3). The magnet
must be beside the sensor. Note: If the magnet
is recessed, use spacer to ensure proper align-
ment (see Figure 3).
4.
Before mounting, hold sensor and
magnet in selected location and verify operation.
While holding the sensor still, move the magnet
away from the sensor to simulate door being
opened. Verify red LED on sensor flashes mo-
mentarily and chime sounds. Note: If sensor does
not operate correctly, see Troubleshooting.
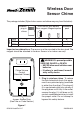
Unplug chime and adjust volume
control to desired volume (see Figure 1). Plug
chime back into wall outlet.
Alignment Arrows
1/2" Maximum
Use Optional Spacer if
Needed
Figure 2
Figure 3
Figure 4