
Owner's Manual


2
205436-01
INSTALLATION
Foreasyinstallation,selectanexistinglightwithawall
switchforreplacement.
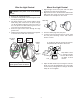
Forbestperformance,mountthextureabout8ft.(2.4m)
abovetheground.
NOTE:
Ifxtureismountedhigherthan
8ft.(2.4m),aimingthesensordownwillreducecoverage
distance.
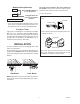
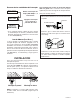
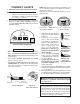
Foreavemountonly:
1.Swingthesensorheadtowardstheclampscrew
joint.
If thesensor pops outof the balljoint, loosen the
clampscrewandpushthesensorbackintotheball
joint.Tightentheclampscrewwhendone.
2.Thenrotatethesensorheadclockwise180°sothe
controlsfacedown.
For under eave installation, the sensor head must
be rotatedasshowninthenexttwostepsforproper
operationandtoavoidtheriskofelectricalshock.
DualBrite
®
Timer
Lightcomesonhalfbrightforselectedtimeafterdusk
(Off,3hr.,6hr.,untildawn).SelectingOFFdisables
thisfeature.Themotionsensingfeatureswillcontinue
toworkasdescribedinthismanual.Ifmotionissensed,
thelightturnsonfullbrightfortheON-TIME(1,5,or
20minutes)thenreturnstodimmode.
Move ON-TIME Switch to
1, 5, or 20 minutes
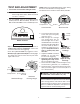
Mode Switching Summary
Flip light switch off
for one second then
back on*
MANUAL MODE
AUTO
TEST
* Ifyougetconfusedwhileswitchingmodes,turnthe
poweroffforoneminute,thenbackon.Afterthecali-
brationtimethecontrolwillbeintheAUTOmode.
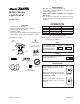
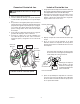
Controls
ClampScrew
Controls
Controls
Wall Mount Eave Mount
NOTE: Lightxtureandsensorshouldbemountedas
shownabovewheninstalled(dependingupontypeof
installation).