
Owner's Manual


3
205436-01
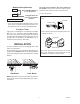
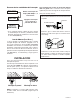
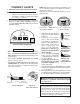
1. Removetheexistinglightxture.
2. Installthemountingstrapasshownusingtwoscrews
thattyourjunctionbox.
3. Theplastichangercanbeusedtoholdthexture
whilewiring.Thesmallendoftheplastichanger
canbethreadedthroughtheholeinthecenterof
thecoverplate.Thesmallendthengoesintoone
oftheslotsonthemountingstrap.
4. Route the light control’s wires through the large
gasketholes.
5. Twistthe junctionboxwiresandxturewirestogether
asshown.Securewithwireconnectors.
White to
White
Black to
Black
Junction box ground wire to
green ground screw on fixture.
Gasket
Mounting
Strap
Mounting
Bolt
Rubber
Plug
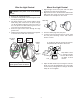
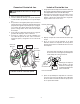
Mount the Light Control
1. Alignthelightcontrolcoverplateandcoverplate
gasket.Securewiththemountingbolt.
2. Alignthethreeslotsinthedecorativeshellwiththe
bulbholderpins.Pushtheshellinandthentwist
clockwisetolock.Repeatforothershell.
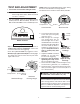
LockNut
Toavoidwaterdamageandelectricalshock,
keepbulbholders30°belowhorizontal.
5. Adjustthebulbholdersbylooseningthelocknuts
butdonotrotatethebulbholdersmorethan180°
fromthefactorysetting.Whenscrewingintheood
lamps,donotovertighten.
Keepbulbsatleast
1"(25mm)fromthe
sensor.Donotallow
the bulbs to block
thelens.Lens
3. Pushtherubberplugrmlyintoplace.
4. Ifawetlocationjunctionboxwasnotused,caulk
the wall plate mounting surface with silicone
weathersealant.
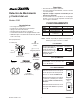
Wire the Light Control
WARNING: Turn power off at circuit breaker
or fuse.
Shell Slot