
Owners manual


559-734-7451 800-367-5480 FAX 559-734-7460
6400 ( R-6400 ) 12/20/06
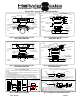
8. Move the lower step bracket front to rear and side to side to adjust the air spring to be as straight
as possible. Once the upper bracket location is established, torque the frame brackets to the
specified rate. Use the extra crossbars provided as shims between the lower step bracket and the
leaf springs to help level the step bracket to the frame bracket as needed. Be sure to run the long
bolts through all the holes in the brackets and crossbars to secure completely. ( SEE FIG # 3
OR # 5 )
9. Place the long bolts into the slots in the step bracket so the threads hang down below the leaf
springs. Attach to the leaf springs with the crossbars, washers and locknuts provided. Make nec-
essary adjustments and torque. Double check all nuts and bolts to assure proper torque. Do not
add any air pressure to the system without double checking torque. At this point all of the
air spring mounting hardware should be torqued.
10. Unroll the air hose and cut into (2) even lengths, roll the ends of the hose on a hard surface to
make the ends as round as possible.
11. Install one end of the hose into the elbow at the top of the air spring. See the hose end diagram
for details on the particular style of hose connections used. ( SEE FIG # 8 )
12. Route the air hose to the desired fill area, this is usually the rear bumper or a minimum 5/16”
hole in the frame. If an on board compressor is being used, follow the hose route instructions
included with the compressor. Route the air hose inside the frame and tie to the frame with the
plastic tie straps provided. Keep the air hose away from the exhaust and the shocks or other areas
where the hose can rub or become chafed on any sharp objects.
13. If needed slide the black hose insulators onto the hose and position near the exhaust. DO NOT
allow the insulator to contact the exhaust, minimum 1-1/2” clearance. Use one inflator valve for
each air spring.
14. Inflate the air spring to approximately 40 PSI and check for clearance on the frame brackets,
tires, brake lines etc.. Check the air spring for proper alignment from top to bottom between the
brackets. Deflate and make adjustments as needed. With the system inflated, squirt soapy water
over all of the hose and fitting connections to check for leaks. Deflate the system and repair as
needed. RETEST
15. KEEP A MINIMUM OF 10 PSI IN THE SYSTEM AT ALL TIMES, YOU MAY SELECT
THE IDEAL INFLATION PRESSURE FOR RIDE CONFORT AND LOAD CARRYING
UP TO 100 PSI MAXIMUM.
ATTENTION INSTALLER: BE SURE CUSTOMER RECIEVES THIS INSTRUC-
TION SHEET, WARNING CARDS AND THE WAR
RANTY FORM.