
Installation Guide

PLEASE SEE PAGE 1 FOR PRE-INSTALLATION REQUIREMENTS
GENERAL SUBFLOOR REQUIREMENTS
• All suboors must be at to 3/16” per 8’ radius. If suboor prep is required, “high
spots” should be sanded or ground down. Do not sand surfaces such as vinyl or
synthetic tiles that may contain asbestos.
• All suboors must be clean and free of debris.
• Nail or screw any loose areas to prevent squeaking. Suboors should have
minimum deection (vertical movement).
SUBFLOOR REQUIREMENTS
• These products can be installed over dry, at wood suboors such as plywood
and OSB. If used over an existing suboor, the thickness of the overlay material must
be such as to yield a total of ¾” suboor thickness.
• Particle board is NOT recommended for staple down installations.
• NOTE: SUBFLOOR IRREGULARITIES THAT CAUSE WOOD FLOORING
INSTALLATIONS TO DEVELOP MOVEMENT OR HOLLOW SPOTS BETWEEN
THE SUBFLOOR AND THE WOOD FLOORING, ARE NOT THE RESULT OF
MANUFACTURING DEFECTS AND ARE NOT COVERED BY WARRANTIES.
SUBFLOOR MOISTURE REQUIREMENTS
• Wooden Suboors should be checked for moisture using a reputable
manufacturer’s moisture meter, designed for use with wood ooring. In general,
wood or plywood subooring should not exceed 14% moisture content, with a
maximum moisture variance not to exceed 4% difference between the ooring and
suboor.
INSTALLING FLOOR
INSTALLING THE FLOOR
• The clean suboor surface should be covered, wall-to-wall, with 15-lb. asphalt
saturated felt or SVS. Lap the edges of the felt/SVS 4” when positioning. Double the
felt/SVS around heating ducts.
• Flooring should be laid at right angles to the oor joists and, if possible, in the
direction of the longest dimension of the room.
• Snap a working line parallel to the starting wall, allowing for expansion space.
(Expansion space should be equivalent to the thickness of the ooring.)
• With the tongue out, lay one row of planks along the length of the working line.
The first row should be face-nailed and countersunk.
• Subsequent rows should be blind nailed wherever possible. With the proper nailer,
nail planks every 4”- 6” and within 2” of the end joint. Push or gently tap boards ush
to the previous row. Only tap against the tongue; tapping the groove may damage
edges.
• Stagger at least 6” between end joints of adjacent board rows. End joints should
not repeat visually across the installed oor. Avoid “H” joints and other discernible
patterns.
• Face-nail and countersink final rows of ooring as necessary.
IMPORTANT NOTES:
• The use of putty to fill small gaps or correct minor defects should be considered
normal in any hardwood installation.
• Hardwood oors should be maintained year round at 35-55% relative humidity
and a temperature between 60-80 degrees. A humidifier / de-humidifier may be
necessary in some homes to maintain these climate conditions.
TOOLS NEEDED
GLUEDOWN INSTALLATION
• Urethane adhesive
• Adhesive remover
• Trowel (check adhesive for recommended notch/size)
• Hammer
• Tape Measure
• Safety Glasses
• Chalk line
• Square
• Pencil
• Wood Chisel
• Circular or rip saw
• Jamb Saw
PLEASE SEE PAGE 1 FOR PRE-INSTALLATION REQUIREMENTS
INSTALLING THE FLOOR
• When the decision is made on the direction the boards will run, snap a working
line parallel to the starting wall, allowing the width of a board plus the tongue and
expansion space. (Expansion space should be equivalent to the thickness of the
ooring.) Temporarily nail a straight starter board along the edge of the working line.
• Once the starter board is secured, apply adhesive to the substrate with the proper
trowel. (Flooring may be installed using either a “wet-lay” or “walk-on” method.
• For “wet-lay” installations, ooring is placed into “wet” adhesive; workers do not
walk on ooring during installation. For “walk-on” installations, spread the adhesive
and allow the adhesive to develop “tack”, then begin to install the ooring material.)
Spread adhesive up to and along the working line.
• Install the first row of planks along the working line with the tongue-side facing
the starting wall. Continue installing subsequent rows, inserting the tongue into the
groove of the previous row. Boards should be engaged by hand. Stagger at least 6
inches between end joints of adjacent board rows. End joints should not repeat
INSTALLING FLOOR
visually across the installed oor. Insure that the proper expansion space is left at
the perimeter of the room.
• As you work, immediately clean any adhesive from the surface of the ooring
using mineral spirits and a soft cloth, being careful not to damage the finish. Lift a
plank periodically to check adhesive transfer. >80% coverage is required.
• After the large part of the room is installed, remove the starter board and
complete the installation. Install moldings and thoroughly clean the oor with an
approved Wood Floor Cleaner. Never cover a newly installed oor with plastic.
Always use a breathable material such as craft paper or cardboard.
IMPORTANT NOTES
• The use of putty to fill small gaps or correct minor defects should be considered
normal in any hardwood installation.
• Hardwood oors should be maintained year round at 35-55% relative humidity
and a temperature between 60-80 degrees. A humidifier / de-humidifier may be
necessary in some homes to maintain these climate conditions.
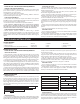
INSTALLATION TIP 1
• To assist with the stability of the first few rows, we recommend that you install
the first row, then 2 to 3 boards in the second row, then 1 to 2 boards in the third
row. Go back to the second row and install another 2 boards, then 2 boards in the
third row. Complete this “stepping” arrangement until the three rows are complete.
Always stagger the end joints of adjacent rows a minimum of 12”. Try to avoid a
“stair-step” pattern when looking across several rows, and try to avoid “H” patterns
in the installation.
1
9
8
7
6
54
32
10
Maintain a 12”
Stagger
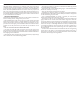
INSTALLATION TIP 2
• In narrow areas (i.e. hallways) where planks will be installed width wise, the planks
must be staggered to incorporate at least one end joint in every other row. Installing same
length boards side by side without this stagger will cause the ooring to bow upward.
INSTALLATION TIPS:
INCORRECT CORRECT
INSTALLATION TIP 3
• Transition pieces (moldings), and the oor itself, are made from real wood and
will exhibit all the natural variations of the particular species. Every transition piece
will not match every board of ooring. Therefore, the best results will be achieved
by identifying boards that are complimentary to the transition prior to installation,
setting the boards aside to be installed next to the transition.