
User Manual

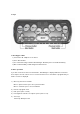
Volume down: Backspace-F1
Pitch up: Enter-F4
Pitch down: Enter-F1
Reading speed up: Space-F4
Reading speed down: Space-F1
Voice on/off: Backspace-F2
5. Power on/off
1) Power off: Push the power switch to the right side
2) Power on: Push the power switch to the left side
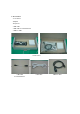
6. How to use cables
1) USB cable: It is used to connect PC and Voice Sense using Active Sync program. Connect
rectangular part of the connector to the PC and connect the other end of the connector to
OTG port of Voice Sense.
2) USB cable for external device: It is used to connect external USB stick memory or USB
hard disk drive to the Pocket Sense. Connect the OTG port of the cable to Voice Sense and
insert the USB device to the other slot of the cable.
3) USB I/O cable: This is supplied to the customer as a replacement of USB connection for the
demonstration units. It will not be supplied at the mass produced products. Connect flat
shaped end of the connector to the wide connector between USB and DC In port of the
Voice Sense, and connect the other port to PC. Then you can use Voice Sense as slave
device of PC.
7. Upgrading OS
For the demonstration unit, the upgrade method is as follows. On the commercial product, the
upgrade methods will be more convenient.
1) Copy the upgrade file to the external memory device like CF memory or SD memory. It
should be copied to root directory of the memory device.
2) Connect the external memory device to the Voice Sense.
3) When the File Manager is displayed, press Space-4 to move to Utility and press enter at
Utility.
4) Press Space-4-5-6 to move to Voice Sense Upgrade and press enter.
5) Then “Upgrade? Online” is displayed. Press Space to change to “offline”.
6) Then press enter. And then the Voice Sense will be upgraded to new image automatically,
and boot automatically after upgrading operating system. It will take about 10 minutes.