
Installation Sheet


start here
commencez ici
empezar aquí
Assembly Instructions
Item No: 29207 / 29209
Les Instructions D’assemblage
Numéro d’article: 29207 / 29209
Instrucciones De Montaje
Número del artículo: 29207 / 29209
L IGH TIN G
HINKLEY
English Spanish
French
H I N K L E Y L IGH TIN G 33000 Pin Oak Pa rkwa y, Avo n Lak e, OH 4 4012 80 0.4 46 .5539 / 44 0.653.5500 hinkle ylighting.com
1. Find a clear area in which you can work.
SAFETY WARNING: READ WIRING AND GROUNDING INSTRUC-
TIONS (I.S. 18) AND ANY ADDITIONAL DIRECTIONS. TURN
POWER SUPPLY OFF DURING INSTALLATION. IF NEW WIRING IS
REQUIRED, CONSULT A QUALIFIED ELECTRICIAN OR LOCAL
AUTHORITIES FOR CODE REQUIREMENTS.
Make electrical connections from supply wire to fixture lead wires.
Refer to instruction sheet (I.S. 18) and follow all instructions to make
all necessary wiring connections. Then refer back to this sheet to
complete installation of this fixture.
ADVERTENCIA DE SEGURIDAD: CABLEADO DE LEER Y
INSTRUCCIONES DE CONEXIÓN A TIERRA (SI 18), E
INSTRUCCIONES ADICIONALES. VUELTA DE ALIMENTACIÓN
DURANTE LA INSTALACIÓN. SI SE REQUIERE UN NUEVO
CABLEADO, CONSULTE A UN ELECTRICISTA O AUTORI-
DADES LOCALES PARA REQUISITOS DEL CÓDIGO.
AVERTISSEMENT DE SÉCURITÉ: CÂBLAGE LIRE ET MISE A LA
TERRE (IS 18) ET TOUTE AUTRE INSTRUCTION. COUPER
L'ALIMENTATION PENDANT L'INSTALLATION. SI DE
NOUVELLES CÂBLAGE NE EST NÉCESSAIRE, CONSULTER UN
ÉLECTRICIEN QUALIFIÉ OU LES AUTORITÉS LOCALES LES
EXIGENCES DES CODES.
-
B
S
1
2
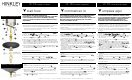
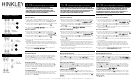
1. To install this fixture please refer to instruction sheet IS-19 provided.
2. After installation is complete it will be necessary to hook the remaining
support chains (C) to the ring (R). To do this, take the appropriate chain
from the center hub (H) and hook the to loop (L) on the inside of the ring
(R). Repeat process for remaining chains
3. Installation is complete and fixture may now be lamped according.
After lamping is completed, glass can be installed.
4. To install the glass (1) first align the three slots (S) on the bottom neck
of the glass, with the three bumps (B) on the inside of the glass holder
(2) - see Drawing 2.
5. Slip bottom neck of glass (1) into the glass holder (2) and twist the glass
to lock it into place.
6. Installation and assembly is complete and power can be restored.
1. Para instalar esta luminaria, consulte la hoja de instrucciones
IS-19 que se proporciona.
2. Una vez completada la instalación, será necesario enganchar las
cadenas de soporte (C) restantes al anillo (R). Para hacer esto,
tome la cadena apropiada desde el centro del centro (H) y
enganche el bucle (L) en el interior del anillo (R). Repita el
proceso para las cadenas restantes
3. La instalación está completa y el accesorio ahora puede ser
instalado. Una vez completado el lamping, el vidrio puede ser
instalado.
4. Para instalar el vidrio (1), primero alinee las tres ranuras (S) en
el cuello inferior del vidrio, con las tres protuberancias (B) en el
interior del soporte del vidrio (2); consulte el Dibujo 1.
5. Deslice el cuello inferior del vidrio (1) en el soporte del vidrio (2)
y gire el vidrio para que encaje en su lugar.
6. La instalación y el montaje están completos y se puede restaurar
la energía.
1. Pour installer ce luminaire, veuillez vous reporter à la fiche
d’instruction IS-19 fournie.
2. Une fois l'installation terminée, il faudra accrocher les chaînes de
support restantes (C) à l'anneau (R). Pour ce faire, prenez la chaîne
appropriée à partir du moyeu central (H) et raccordez la boucle to (L)
à l'intérieur de la bague (R). Répéter le processus pour les chaînes
restantes
3. L’installation est terminée et le luminaire peut maintenant être
équipé d’un éclairage. Une fois la pose terminée, le verre peut être
installé.
4. Pour installer le verre (1), alignez d’abord les trois fentes (S) sur le
col inférieur du verre, avec les trois bosses (B) à l’intérieur du
porte-verre (2) - voir dessin 1.
5. Glissez le goulot inférieur du verre (1) dans le porte-verre (2) et
tournez le verre pour le verrouiller.
6. L'installation et le montage sont terminés et le courant peut être
rétabli.
DRAWING 1 - MOUNTING
DRAWING 2 - MOUNTING
H
C
R
L