
Manual


Part No. 4801-5369 Rev. 10-07 Chimney Vent Page 5 of 12
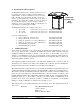
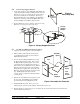
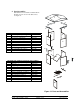
5.4 Attach Canopy Support Brackets
1. Locate the four Canopy Support Brackets and install to the
outside angle brackets of the assembled chamber as shown
in Figure 3. Use (2) ¼ x 1 inch bolts, (2) ¼ inch washers
and (2) ¼ inch lock nuts in each bracket. The Canopy
Support Brackets also provide stability to the Chamber, so
after they are installed, verify that the Baffle still rotates
freely (if a Baffle was installed as in Section 5.2).
2. If a Vent Extension is used, continue to Section 5.5. If an
Extension is not used, proceed to Section 5.7.
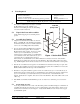
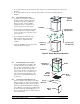
5.5 Assemble the Chimney Extension (if required)
1. Align the four extension panels a shown in Figure 4.
2. Drill a ¼ inch hole through the foam using the
top, middle and bottom hole in each of the four
aluminum angle brackets.
3. For ease when inserting the Baffle, first connect
the Front and Left sides together. Then connect
the Right and Rear panels together. Use (4) ¼ x
1-3/4 inch bolts, (4) ¼ metal washers and (4) ¼
inch lock nuts on each aluminum corner channel.
Place the lock nuts to the inside of the chamber.
Install, but do not tighten, the bottom bolts in the
Extension. These bolts will be removed in a later
step. NOTE: Tighten the other lock nuts
securely, but do not distort the extruded channels
or foam panels.
4. Slide the two assembled sections together. Insert
the pivot pins of the Baffle into the predrilled
pivot holes in the Left and Right side panels.
5. Install the Baffle Stop Bolt. This is a ¼ x 2-½"
bolt through the center hole in Front Panel. Refer back to Section 5.3.
6. Bolt the extension together using (4) ¼ x 1-½ inch bolts, (4) ¼ inch washers and (4) ¼ inch lock nuts
in the middle and bottom holes.
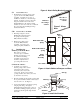
Figure 2
Baffle Stop Bolt
Inside of
Chamber
Figure 4 Assemble the Extension
Baffle
Side
Panel
A
ssem.
Front
Rear
Right
Left
End with
Spring
Baffle
Stop Bolt
Figure 3 Canopy Support Brackets
Canopy
Support
Bracket