
User Guide

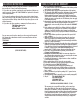

Final Assembly:
First, place fan head
assembly onto the exten-
sion pole, lining up the
fan post screw with the
hole in the extension
pole. Then, simply insert
the fan post screw into
the hole and tighten until
a secure fit is obtained.
Lastly, insert the tilt
adjustment knob into the
neck joint and tighten in
place.
NOTE: If your fan does not have a screw hole in the extension pole but
instead has an indentation around the top of the pole; please do the following:
Step 1: First, place the fan head assembly onto the extension pole and
tighten the fan post screw until a secure fit is obtained.
Step 2: Insert the tilt adjustment knob into the neck joint and tighten in
place.
OPERATING INSTRUCTIONS:
Step 1: Set fan base on a dry, level surface.
Step 2: Plug cord into any standard 120 volt AC outlet. Please make sure
the Selector (Speed) Control is in the Off position. Selector (Speed)
Control is located on the top of the Fan Motor Housing.
Step 3: The SPEED is adjusted by turning the control knob to the desired
setting, Off-High-Med-Low.
Step 4: The OSCILLATION Control knob is located on the top of the Fan
Motor Housing. To Start Oscillation, Push Control knob down. To
Stop Oscillation, Pull Control knob up.
ADJUSTMENT INSTRUCTIONS:
Tilt Adjustment:
Follow these instructions to tilt the Fan Head for upward angle air movement.
STEP 1: To change the tilting angle of the fan head, simply loosen the Tilt
Adjustment Knob (see fig.4).
STEP 2: Move the fan head to the desired angle, then firmly tighten the
knob to lock in place.
Height Adjustment:
Follow these instructions to adjust the height of the fan.
STEP 1: Turn the extension pole base collar (see figure 3 and 5 on Page 2)
counter-clockwise to loosen pole.
STEP 2: Adjust the pole to the desired height, and firmly tighten collar in a
clockwise direction.
CLEANING/MAINTENANCE INSTRUCTIONS:
Follow these instructions to correctly and safely care for your Holmes
Products
©
stand fan. Please remember:
• Always unplug the fan before cleaning or disassembling.
• Do not allow water to drip on or into the fan motor housing.
• Be sure to use a soft cloth moistened with mild soap solution.
• Do not use any of the following as a cleaner: gasoline, thinner, or benzine.
Fan Blade Cleaning:
(See instructions for fan head assembly on page 2, figure 4 )
STEP 1: To access the fan blade, remove the front grill and blade cap.
STEP 2: Clean the fan blade, front and rear grills with a soft, moist cloth.
STEP 3: Replace blade, tighten blade cap, and securely fasten the front grill.
Fan Head, Base, and Pole Cleaning:
Using a soft, moist cloth, with or without a mild, soap solution, carefully
clean the fan base, pole, and head. Please use caution around the motor
housing area. Do not allow the motor or other electrical components to be
exposed to water.
FAN STORAGE:
Your fan can be stored in the off-season either partially disassembled or
assembled. It is important to keep it in a safe, dry location.
• If stored disassembled, we recommend using the original (or appropri-
ately sized) box.
• If stored assembled or partially assembled, remember to protect the
fan head from dust.
The exclusive Holmes Products FanBonnet is available to protect your fan.
Fan Post Screw
Extension Pole
Screw Hole
Figure 6