
Instructions / Assembly

Assembling the tree
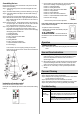
Please remove protective covers from the base of the pole for each tree
section before assembling.
Step 1. Insert tree bottom (D) into the tree stand and tighten the screw.
(See Fig. 1)
Step 2. Insert lower middle section (C) into the tree bottom (D). (See Fig. 2)
Step 3. Insert upper middle section (B) into the lower middle section (C).
(See Fig. 3)
Step 4. Insert tree top (A) into the upper middle section (B). (See Fig. 4)
Step 5. Allow branches to fall into place or gently pull branches up and out.
When adjusting branches be sure that all wires are free of branch
hinges. (See Fig. 5)
Step 6. Shape the branches. Starting with tips closest to the pole, shape
one tip to the right, one to the left and one at the center of the main
stem. Repeat pattern for each branch. (See Fig. 6)
Step 7. Plug the power cord into a proper outlet. Please note this tree
comes with a foot pedal switch and remote control for easy
illumination and changing functions. This tree is Color Changing,
the 8 lighting options available are:
1. Steady Warm White
2. Flashing Warm White
3. Fade In and Fade Out Warm White
4. Steady Multicolor
5. Flashing Multicolor
6. Fade In and Fade Out Multicolor
7. Sequential Multicolor & Warm White
8. Color Changing
These functions can be changed by pressing the foot pedal
switch or using the remote control. Please see the instructions of
remote control below.
Instruction of remote control
Please note this tree has a remote control.
Please pull out the insulation tape from the remote control, before starting
to use it.
1. Press Fn button, the function below cycle. Press the number key,
select from the following corresponding lighting functions:
Function 1: Steady Warm White
Function 2: Flashing Warm White
Function 3: Fade In and Fade Out Warm White
Function 4: Steady Multicolor
Function 5: Flashing Multicolor
Function 6: Fade In and Fade Out Multicolor
Function 7: Sequential Multicolor & Warm White
Function 8: Color Changing
There is memory mode on function adjustment.
If the remote control does not work, check whether the battery of the
remote control is out of power.
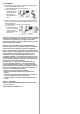
To replace the remote control battery:
1. Replace with a new button cell “CR2025” (3 volt) into
the compartment.
CAUTION: DO NOT DISPOSE OF
BATTERIES IN FIRE. BATTERIES MAY EXPLODE
OR LEAK.
Operation
Turning on the tree
Step 1. Connect each tree section well and plug the power cord into a wall
outlet.
Use and Care Instructions
a) Before using or reusing, inspect product carefully. Discard any
products that have cut , damaged, or frayed wire insulation or cords,
cracks in the lampholders or enclosures, loose connections, or
exposed copper wire.
b) When storing the product, carefully remove the product from wherever
it is placed, including tree, branches, or bushes, to avoid any undue
strain or stress on the product conductors, connections, and wires.
c) When not in use, store neatly in a cool, dry location protected from
sunlight.
Care and Cleaning
Step 1. Remove all ornaments and decorations.
Step 2. Unplug the power cord from the wall outlet.
Step 3. Gently lift the tree top straight up to remove from the center section
and fold all branches towards the pole.
Step 4. Repeat this step for the center and bottom tree sections.
Step 5. Carefully place all tree sections into a shipping box and tape it shut.
Step 6. Store your tree neatly in a cool, dry place away from sunlight.
Troubleshooting
Problem Solution
The tree
does not light
Ensure that all tree sections are connected into each
other well by pressing each section down and rotating.
Make sure the power cord is well connected to the
wall outlet.
If you are still experiencing problems with the tree
please call 1-877-527-0313 for instructions.