
Use and Care Manual
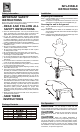

Inating the unit
Step 1. Plug the inatable unit (A) into a receptacle or other
outlet device. The unit begins to inate and remains
inated until you unplug the unit.
Step 2. Once fully-inated, clip the tethers (D) to each of the
loops on the side of the inatable unit (A).
Step 3. Using the loops attached at the bottom of the inatable
unit (A), insert base stakes (B) into the ground.
Step 4. Insert the tether stakes (C) into the ground and attach
the tethers (D).
Step 5. Drive stake into ground at a 45 degree angle from the
inatable unit (A).
NOTE: To devate, unplug the unit. For faster deation,
unzip the zipper on the unit after you unplug it.
For indoor and outdoor use.
120 V 60 Hz.
Replacing the fuse
CAUTION: Risk of Fire: Replace only with same
size and type of fuse.
CAUTION: Risk of Fire: Do not replace the
attachment plug. Contains a safety device (fuse) that should not
be removed. Discard product if attachment plug is damaged.
Step 1. Grasp plug and remove from the receptacle or other
outlet device. Do not unplug by pulling on the cord.
Step 2. Open fuse cover. Slide open the fuse access cover
on top of the attachment plug towards blades. (See
illustration)
Step 3. Remove fuse carefully.
Step 4. Replace fuse only with 5 Amp Max, 125 Volt (provided
with product).
Step 5. Close the fuse cover. Slide closed the fuse access
cover on top of the attachment plug.
Operation Care and Cleaning
Troubleshooting
MADE IN CHINA
PRINTED IN CHINA
DISTRIBUTED BY:
HOME DEPOT
2455 PACES FERRY RD., N.W.
ATLANTA, GA 30339
FOR ASSISTANCE, CALL:
1-877-527-0313
HOMEACCENTSHOLIDAY.COM
a. Wipe the unit with a damp cloth and allow the unit to dry
before storing. If necessary, you can use a mild detergent.
b. When the product is placed on a live tree, the tree should
be well maintained and fresh. Do not place on live trees in
which the needles are brown or break off easily. Keep the
tree holder lled with water.
c. If the product is placed on a tree, the tree should be well
secured and stable.
d. Before using and reusing, inspect the product carefully.
Discard any products that have cut, damaged or frayed wire
insulation cords, cracks, lamp holders or enclosures, loose
connections, or exposed copper wire.
e. When storing the product, carefully remove the product from
wherever it is placed, including trees, branches, or bushes, to
avoid any undue strain or stress on the product conductors,
connections and wires.
f. When not in use, store neatly in a cool, dry location protected
from sunlight.
Problem: The unit is not inating.
a. Ensure that the unit is plugged in.
b. Check for and remove any debris from the motor.
c. Ensure that the zipper on the unit is completely closed.
d. If the outdoor temperature is below 14° F (-10° C), the motor
does not work until the outdoor temperature increases.
Problem: The unit is torn.
a. You can hand sew tears with any type of thread or use clear
packing tape to cover the tear.
Problem: The unit deates after unplug.
a. The unit will not stay inated unless it is plugged in and the
fan is blowing air.
Problem: I have stored my Airblown
®
Inatable for several
months and now the motor does not work.
a. Sometimes the air intake may be blocked by loose grass/
leaves or other particles. Gently shake, knock or tap the
motor and see if it will operate again.
SKU#
Model #:
73819
1002404535
Replacing the bulb
CAUTION: To reduce the risk of overheating,
replace burned-out bulbs promptly. Only use C7, 7-Watt Max
Candelabra-base 120 Volt UL-Classied bulbs (one is provided).
CAUTION: Unplug the unit and allow the bulb to
completely cool before you replace the bulb. Do not touch the
bulb when the power is On. The bulb is extremely hot.
Replacing the bulb (continued)
Step 1. Grasp the plug and remove it from the receptacle. Do
not unplug by pulling on the cord.
Step 2. Open the zipper on the inatable unit.
Step 3. Open the protective bulb cover carefully by pressing
down on the two locking side tabs simultaneously.
Step 4. Remove the bulb from the socket and replace.
Step 5. Do not over-tighten the lamp as this may damage the
lamp or lamp holder.
A
D
45°
45°
90°
C
B