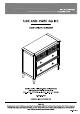
ROOD DECORATORS Item # 1004254868 USE AND CARE GUIDE CANE CHEST 3 DRAWER Questions, problems, missing parts? Before resuming to the store, call Home Decorators Collection Customer Service 8am. 7 pm, EST, Monday Friday, p.m., EST, Saturday 1-800-086-3460 THANK YOU We approval the trust and confidence you have placed in Home Decorators Collection rough the purchase of this Cane Hast 3 Drawer. We stile io continually cradle quality products designed to enhance your home.
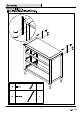
Table of Contents .. Safety Information . Warranty... What is Covered What is not Covered Pr-Assembly. Planning Assembly. wwhNRNON Tools required 3 Hardware Included 3 Package Contents 4 Assembly... ..5 Maintenance .. . I. Care and Cleaning 11 Troubleshooting ed 11 O Keep small parts away from children during assembly. O Read and follow instructions carefully. O Read these instructions carefully and keep in a safe place.
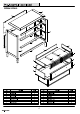
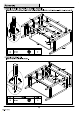
PLANNING ASSEMBLY Uss a soft cloth between these parts and the floor. Identify the parts which make up your pace of furniture. Gather the hardware parts and count them. Have the necessary tools ready. . Keep Allen Key & Wrench as the Bolts & Nuts may need to be tightened in the future.
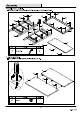
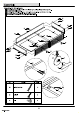
1 Attaching Cam Lock Bolts. O Attach Cam Lock Bolts (CC) to Top Panel {A}, Left & Right Assemblies Small Back Panel () no Join the Back Panels. O Attach Small Back Panel {G} to Large Back Panel {H} using Cam Locks (DD) CD.
3 Attaching the Rails & Back Panels to Left & Right Assemblies. 0 Attach Front Tap, Front & Fran Bottom Rails (0, (E) & (F), Small & Large Back Panels Left & Right Assemblies {B) & (C) using Cam Locks {DD) a Attaching Top Panel to unit. 0 Attach Top Pane! (A} to unit using Cam Lock (DD). ©3D.
5 Prevent the tipping over. O Attach Tipping Restraints {HH) to unit using Tipping Screws (GG). O Attach the unit fo tha wall using Screws & Fischer (Not provided). HH Tipping Restraint CD.
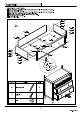
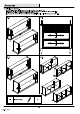
6 Assembly the Small Drawers. 0 Attach Small Drawer Left & Right Small Drawer Back (L) using Flat Head Screws {Long} {AA). 0 Insert Drawer Base (M} into groove. 0 Attach Small Drawer Front {} to Small Drawer Left & Right (J} & (K) using Flat Head Screws {Long} (AA) 0 Attach Drawer Support {N} to unit using Fiat Head Screws (Long) (AA). 0 Attach Handles (FF) to Small Drawer Front () using Handle Bolts (EE) E Handle Bolt 2 FF Haida SO) 2 CID.
7 Assembly the Large Drawers. 0 Attach Large Drawer Left & Right Large Drawer Back (R) using Fiat Head Screws {Long} (AA) O Insert Drawer Base (M} into groove. 0 Attach Large Drawer Front (0) to Large Drawer Left & Right (P) & {Q) using Flat Head Screws {Long} {AA) 0 Attach Handle {FF} to Large Drawer Front {0) using Handle Bolt (EE). O Attach Drawer Support {N} fo unit using Fiat Head Screws (Long) (AA) 0 Do the same step to the next drawer. 0 Slide drawers into unit. G3D.
8 Adjusting the Drawers. 0 Loosen slightly screws per-installed on back of Small & Large Drawer Fronts () & (0). (8.1) 0 Insert drawer into unit, then adjust drawer front panel Sift or right & up or down until drawer gaps look proportional. (8.2} 0 Pull drawer pane slowly, then re tighten screws loosened in Step 8.1. (8.3) 01 Marks sure drawer front panels da not move & lock drawer front pans! into position using Fiat Head Screws (Short) (BB). (8.4) @®1) 8.2) ©3D.
NEVER 1. Allow liquids to remain on furniture. Absorption causes parts to warp and split and finishes to laminate. 2. Use glass cleaner an finished furniture. Ammonia chemically attacks the finish. DO NOT 1. Place in direct sunlight to prevent fading. 2. Write directly on surface to prevent marking. 3. Place hot objects on surface to prevent finish damage. 4. Use rubber based place mats to prevent discoloring. 5.
HOME DECORATORS COLLECTION Questions, problems, missing parts? Before resuming to the store, cal Home Decorators Collection Customer Service gam. 7 p.m, EST, Monday Friday, 9am. 6 p.m, EST, Saturday 1-800-986-3460 HOME DEPOT.