Item #1000 000 000 Item #1000 000 #XXXXXXX 000 Model Model #16818 USE AND CARE GUIDE 3-LIGHT FLUSH MOUNT Questions, problems, missing parts? Before returning to the store, call Home Decorators Collection Customer Service 8 a.m. - 7 p.m., EST, Monday-Friday, 9 a.m. - 6 p.m., EST, Saturday 1-800-986-3460 HOMEDEPOT.
Table of Contents Hardware Included ...................................................................3 Package Contents ....................................................................4 Installation ..................................................................... 5 Care and Cleaning ........................................................ 7 Troubleshooting ............................................................ 7 Service Parts .................................................................
Pre-Installation PLANNING INSTALLATION Read all instructions before installing. To avoid damaging this product, place it on a soft, non-abrasive surface, such as carpet or cardboard. IMPORTANT: Inspect the wire insulation for any cuts, abrasions, or exposed copper that may have occurred during shipping. If there is a defect in the wire, do not attempt installation. Please call the Customer Service Team at 1-800-986-3460. NOTE: You may use three 40 W type G9 xenon bulbs (included).
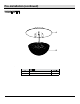
Pre-installation (continued) PACKAGE CONTENTS A B Part A Description Fixture body B Shade Quantity 1 1 4
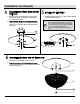
Installation 1 Preparing the mounting bracket 2 Installing the mounting bracket □ Fasten the mounting bracket (AA) onto the outlet box using two outlet box screws (CC). □ Tighten the support screws (BB) (long) into the inside mounting holes of the mounting bracket (AA) (to be fully tightened later), and secure with hex nuts (DD). NOTE: The support screws (BB) should extend long enough to protrude throu it is mounted. (Adjust as needed).
Installation (continued) 4 5 Installing the light bulbs outlet box □ Install the light bulbs (JJ) into the sockets. Use three 40 W G9 base xenon bulbs (included). □ Place the canopy of fixture body (A) over the outlet box and allow the support screws (BB) to come through the holes of the fixture body (A). □ of the support screws (BB) on the mounting bracket (AA) until the canopy of fixture body (A) is held firmly against the ceiling. NOTE: Use only Max 40W type G9 xenon bulbs.
Care and Cleaning □ Do not use any cleaners with chemicals, solvents, or harsh abrasives. Use only a dry, soft cloth to dust or wipe carefully. □ To clean the xture, disconnect the power by turning off the circuit breaker or by removing the fuse at the fuse box, and use a dry or slightly dampened, clean cloth to wipe the exterior surface of the ure. Troubleshooting Problem Possible Cause Solution The lights will not turn on. The bulb is burned out. Replace the light bulb. The power is off.
Service Parts MODEL TYPE : 16818 AA DD CC BB EE FF GG HH JJ II A B Part Part Description AA Description Mounting bracket GG BB Support screw HH Finial Plastic washer CC DD Outlet box screw EE Green ground screw (Pre-installed to mounting bracket (AA) II JJ A FF Wire connector Hex nut B 8 Cap nut 40W G9 xenon Bulb Fixture body Shade HOMEDEPOT.COM/HOMEDECORATORS Please contact 1-800-986-3460 for further assistance.
Questions, problems, missing parts? Before returning to the store, call Home Decorators Collection Customer Service 8 a.m. - 7 p.m., EST, Monday-Friday, 9 a.m. - 6 p.m., EST, Saturday 1-800-986-3460 HOMEDEPOT.COM/HOMEDECORATORS Retain this manual for future use.