
Installation Guide


9
HOMEDEPOT.COM/HOMEDECORATORS
Please contact 1-800-986-3460 for further assistance.
Assembly - Hanging the Fan (continued)
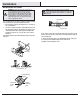
Making the electrical connection
3
IMPORTANT: Use the plastic wire connectors (BB) supplied with
your fan. Secure the connectors with electrical tape and ensure
there are no loose strands or connections.
WARNING: Each wire nut supplied with this fan is designed to
accept up to one 12-gauge house wire and two wires from the
fan. If you have larger than 12-gauge house wiring or more
than one house wire to connect to the fan wiring, consult an
electrician for the proper size wire nuts to use.
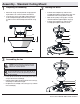
□ The fan comes with 30 in. lead wires for use with an extended
ball/downrod assembly. If using the 6 in. ball/downrod
assembly (B) provided, you can cut the lead wires to your
desired length. This will make extra room in the canopy (C), if
you do not wish to cut the wires, you will need to neatly wrap
them.
□ Please refer to remote installation
instructions at the beginning of this
document.
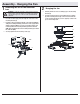
NOTE: The fan comes with 30 in. lead wires for use with an
extended ball/downrod assembly. If using the 6 in. ball/downrod
assembly (B) provided, you can cut the lead wires to your desired
length.
IMPORTANT: If after this step, you decide to check that the
electrical connections have been successful, it is critical to attach
the switch cup using the quick connector. The fan will not operate
unless the switch cup is connected to the fan.