
Installation Guide


9
HOMEDEPOT.COM/HOMEDECORATORS
Please contact 1-800-986-3460 for further assistance.
Assembly - Hanging the Fan
Attaching the fan to the electrical box
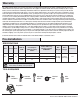
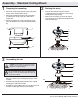
□ Pass the 120-Volt supply wires through the center hole in the
mounting bracket (A).
□ Install the ceiling mounting bracket on the outlet box by sliding
the mounting bracket (A) over the two screws (UU) provided with
the outlet box. If necessary, use leveling washers (not included)
between the mounting bracket (A) and the outlet box. Note that
the at side of the mounting bracket (A) is toward the outlet box.
When using close-to-ceiling mounting, it is important that the
mounting bracket be level.
□ Securely tighten the two mounting screws (UU).
3
WARNING: To reduce the risk of re, electric shock
or personal injury, mount to outlet box marked
“acceptable for fan support of 35lbs. (15.9 Kg) or
less” using the screws provided with the outlet box.
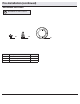
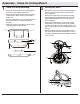
Hanging the fan
□ Carefully lift the fan motor assembly (D) up to the mounting
bracket (A).
□ Seat the hanger ball portion of the ball/downrod assembly (B)
in the mounting bracket socket. Ensure that the tab on the
mounting bracket (A) socket is properly seated in the groove
in the hanger ball. If using close-to-ceiling mounting, hang the
fan on the hook provided by utilizing one of the holes at the
outer rim of the ceiling canopy (C).
4
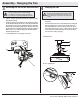
WARNING: The hook as shown is only to balance the
fan while attaching wiring. Failure to hang as shown
may result in hook breaking, causing the fan to fall.
The hook must pass from inside to the outside of the
canopy.
C
A
B
D
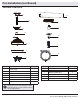
Standard mount.
FF
A
FF
D
C
XX
Close to ceiling mount.
A
UU
UU