P1 Item #1001 784 408, 1001 784 409, 1001 784 407, 1001 784 410, 1001 784 405 Model #68681, 68682, 68683, 68684, 68685 ETL Model #68-ATRDC USE AND CARE GUIDE ALTURA 68-INCH CEILING FAN Questions, problems, missing parts? Before returning to the store, call Home Decorators Collection Customer Service 8 a.m. - 7 p.m., EST, Monday-Friday, 9 a.m. - 6 p.m., EST, Saturday 1-800-986-3460 HOMEDEPOT.COM/HOMEDECORATORS To view an instructional video on how to install this product: 1. Go to www.homedepot.
Table of Contents Table of Contents................................................................. 2 Assembly............................................................................... 7 Safety Information................................................................ 2 Operation............................................................................ 13 Warranty................................................................................ 3 Care and Cleaning................................
Warranty The supplier warrants the fan motor to be free from defects in workmanship and material present at time of shipment from the factory for a lifetime after the date of purchase by the original purchaser. The supplier also warrants that all other fan parts, excluding any glass or acrylic blades, to be free from defects in workmanship and material at the time of shipment from the factory for a period of three years after the date of purchase by the original purchaser.
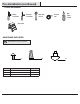
Pre-Installation (continued) TOOLS REQUIRED Phillips screwdriver Flat blade screwdriver Adjustable wrench Wire cutter / stripper Electrical tape Step ladder HARDWARE INCLUDED NOTE: Hardware not shown to actual size.
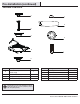
Pre-Installation (continued) PACKAGE CONTENTS A F B G B C H D I E Part Description Quantity A Slide-on mounting bracket (inside canopy) 1 B Ball/downrod assembly C D Part Description Quantity E Switch cup 1 F Decorative motor collar cover 1 1 G Blade 5 Canopy with canopy ring attached 1 H Switch cup adaptor 1 Fan-motor assembly 1 I Transmitter (battery included) 1 IMPORTANT: This product and/or components are governed by one or more of the following U.S.
Installation MOUNTING OPTIONS WARNING: To reduce the risk of fire, electric shock or personal injury, mount to outlet box marked “Acceptable for fan support of 50 lbs. (22.7 kg) or less”, and use screws provided with the outlet box. An outlet box commonly used for the support of lighting fixtures may not be acceptable for fan support and may need to be replaced. If in doubt, consult a qualified electrician.
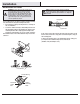
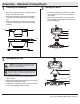
Assembly - Standard Ceiling Mount 1 2 Preparing for mounting □□ Remove the canopy ring (L) from the canopy (C) by turning □□ □□ Routing the wires □□ Route the wires exiting the top of the fan motor (D) into the decorative motor collar cover (F) and through the canopy ring (L). the ring to the right until it unlocks. Remove the mounting bracket (A) from the canopy (C) by loosening the two screws (HH) located in the “L shaped” slots Remove and save the two non-slotted screws (SS) in the round holes.
Assembly - Hanging the Fan 1 2 Attaching the fan to the electrical box □□ Carefully lift the fan motor assembly (D) up to the mounting WARNING: To reduce the risk fo fire, electric shock or personal injury, mount to outlet box marked “acceptable for fan support of 50 lbs. (22.7 kg) or less”, and use screws provided with the outlet box. bracket (A). □□ Seat the hanger ball portion of the ball/downrod assembly (B) in the mounting bracket (A) socket.
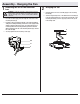
Assembly - Hanging the Fan (continued) 3 Making the electrical connection Outlet box in the ceiling (OO) WARNING: Each wire nut supplied with this fan is designed to accept up to one 12-gauge house wire and two wires from the fan. If you have larger than 12-gauge house wiring or more than one house wire to connect to the fan wiring, consult an electrician for the proper size wire nuts to use. Black IMPORTANT: Use the plastic wire connectors (BB) supplied with your fan.
Assembly - Hanging the Fan (continued) 4 5 Wrapping the extra wire Mounting the fan-motor assembly (standard mount) WARNING: When using the standard ball/downrod mounting, the tab in the ring at the bottom of the mounting bracket must rest in the groove of the hanger ball. Failure to properly seat the tab in the groove could cause damage to the wiring. NOTE: Follow this step ONLY if you did not cut the extra length off from the wires coming from the ceiling fan.
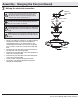
Assembly - Hanging the Fan (continued) 6 Attaching the fan blades AA NOTE: The blades must be installed before attempting to operate the fan. If the blades are not installed, the motor will not function properly. J D □□ Attach a blade (G) to a blade bracket (J) using the decorative □□ □□ nuts (CC) and blade attachment screws (AA) provided. Insert a blade attachment screw (AA) through a hole in the blade (G) and the blade bracket (J) and into the decorative nut (CC).
Preparing the Remote Control Pairing the Remote Control NOTE: The remote control has already been paired to the ceiling fan for your convenience. If you have two of the same model fans in your home, please follow the steps below to control each fan independently. breaker box. the blades will begin to spin. LEARN compartment within 30 seconds. □□ If pairing is successful, the fan’s light kit will flash (if applicable) and 0 1 □□ Return power to the fan at the wall switch or breaker box.
Operating Your Fan and Remote Control 1. Fan button. - Press and release the button to turn the fan on or off. □□ Fan on. The fan memory function will resume the speed set on the fan prior to the power being turned off. The LED bar will display the current settings for 5 seconds after the button is released. LED bar Scale indicating fan speed □□ Fan off. The fan memory function will store the current setting for the next time the fan is in use.
Operating Your Fan and Remote Control 4. Timer □□ Pressing the timer button will automatically turn fan and light (if light is on) off after 2, 4, or 8 hours. When you activate the timer mode, the LED to the left of the time above the clock will illuminate. Off 2H 4H 8H Disables timer 5. Fan reverse button (Must be pushed when the fan is in operation) □□ Warm weather: LED bar will illuminate and the lights will flow from high to low.
Care and Cleaning WARNING: Make sure the power is off before cleaning your fan. □□ Because of the fan’s natural movement, some connections may become loose. Check the support connections, brackets, and blade attachments twice a year. Make sure they are secure. It is not necessary to remove the fan from the ceiling. □□ Clean your fan periodically to help maintain its new appearance over the years.
Questions, problems, missing parts? Before returning to the store, call Home Depot Customer Service 8 a.m. - 7 p.m., EST, Monday-Friday, 9 a.m. - 6 p.m., EST, Saturday 1-800-986-3460 HOMEDEPOT.COM/HOMEDECORATORS Retain this manual for future use.