
Installation Guide


12
Preparing the Remote Control
Setting the light function on your remote
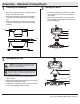
□ Remove the battery cover by pressing rmly on the arrow and
sliding the cover off.
□ If your fan is equipped with a light kit and using dimmable bulbs,
slide the dip switch from “on” to “dim” (for non-dimmable bulbs,
the dip switch must be set to “on”).
□ Install two 1.5V AAA batteries (included).
□ Replace the battery cover on the remote control.
NOTE: The battery will weaken with age and should be replaced
before leaking takes place as this will damage the remote control.
Dispose of used battery properly and keep the battery out of the reach
of children.
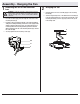
NOTE: The switch marked ON/DIM controls the dimming function of
the lights: If using non-dimmable bulbs, use a ballpoint pen or small
screwdriver to set the switch to ON to disable the dimming function.
If using dimmable bulbs, set the switch to DIM to enable the dimming
function.
0 1
LEARN
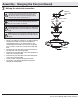
□ Slide the dip switch in the battery compartment to the “1” setting.
□ Conrm that the power to the fan is off at either the wall switch or
breaker box.
□ Return power to the fan at the wall switch or breaker box.
□ Press and release the “Learn” button located in the remote’s battery
compartment within 30 seconds.
□ If pairing is successful, the fan’s light kit will ash (if applicable) and
the blades will begin to spin.
Pairing the Remote Control
NOTE: The remote control has already been paired to the ceiling fan
for your convenience. If you have two of the same model fans in your
home, please follow the steps below to control each fan independently.
0 1
0 1
LEARN
LEARN