
Instructions / Assembly


6 HOMEDEPOT.COM/HOMEDECORATORS
Please contact 1-800-986-3460 for further assistance.
Installation
1
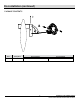
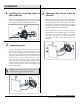
Installing the mounting plate to
the outlet box
3
Mounting the fixture body on
the wall
□ Mount the mounting plate (DD) to the outlet box using
the two provided outlet box screws (CC). The side of the
mounting plate (DD) marked “GND” must face out.
□ Mount the fixture (A) on the wall by aligning the
mounting plate (DD) wing holes to the side holes of
the fixture body (A). Be careful not to pinch any of the
wires between the fixture and the outlet box. Tighten
the fixture to the wall by screwing the two screws (AA)
into the side holes of the back fixture (A).
□ Once the fixture (A) is mounted on the wall, caulk the
space between the wall and the upper 3/4 area of the
fixture (A) to prevent water seeping into the outlet
box. Leave the bottom 1/4 area un-caulked for
drainage of any water which might leak into the
enclosure.
2
Connecting wires
□ Connect the white wire from the fixture (A) to the white
wire from the outlet box, and the black wire from the
fixture (A) to the black wire from the outlet box. Cover
the two wire connections using the two provided wire
connectors (EE). Wrap the two wire connections with
electrical tape for a more secure connection. If your
outlet box has a ground wire (green or bare copper),
connect the fixture’s (A) ground wire to it using the wire
connector (EE). Otherwise connect the copper ground
from the fixture (A) to the ground screw (BB) on the
mounting plate (DD).
NOTE: If you have electrical questions, consult your local
electrical code for approved grounding methods.