Item #205107798, 205107836, 205107860, 205107712 Model #248-85-58-Y, 248-85-80-Y, 248-85-65-Y, 248-85-73-Y USE AND CARE GUIDE LUDLOW ELECTRIC FIREPLACE Questions, problems, missing parts? Before returning to the store, call Home Decorators Collection Customer Service 8 a.m. - 6 p.m., EST, Monday - Friday 1-8OO-986-3460 HOMEDEPOT.COM/HDC THANK YOU We appreciate the trust and confidence you have placed in Home Decorators Collection through the purchase of this electric fireplace.
Table of Contents Table of Contents. . . . . . . . . . . . . . . . . . . . . . . . . . . . . . . . . . . . 2 Warranty. . . . . . . . . . . . . . . . . . . . . . . . . . . . . . . . . . . . . . . . . . . 3 What is covered. . . . . . . . . . . . . . . . . . . . . . . . . . . . . . . . . . . . 3 What is not covered. . . . . . . . . . . . . . . . . . . . . . . . . . . . . . . . . 3 Pre-Installation. . . . . . . . . . . . . . . . . . . . . . . . . . . . . . . . . . . . . . 4 Installation . . . . . . . . . . . .
Warranty 1-YEAR WARRANTY WHAT IS COVERED The manufacturer warrants that your new electric fireplace is free from manufacturing and material defects for a period of one year from date of purchase, subject to the following conditions and limitations. Variations in actual wood color and finishes which may result from natural characteristics of the wood, such as grain patterns, mineral streaks and the like, are not considered defects.
Pre-Installation PLANNING INSTALLATION Before beginning assembly of product, make sure all parts are present. Compare parts with the package contents list and hardware contents list. If any part is missing or damaged, do not attempt to assemble the product.
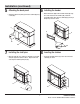
Pre-Installation (continued) PACKAGE CONTENTS B A E D C F G Part Description Quantity A Top Panel 1 B Base Cabinet 1 C Upper Back Panel 1 D Upper Front Panel 2 E Upper Side Panel 2 F Adjustable Shelf 4 G Removable Header 1 5 HOMEDEPOT.COM/HDC Please contact 1-800-986-3460 for further assistance.
Installation 1 2 Attaching the connectors □□ Lay one upper front panel (D) and one upper side panel (E) on a clean, flat surface. Attach two short connectors (BB) to the upper front panel (D) using bolts (AA). Attach one long connector (CC) and four short connectors (BB) to the upper side panel (E) as shown using bolts (AA). Repeat using the remaining upper front panel (D) and upper side panel (E). □□ Insert two dowels (DD) in the predrilled holes in the edge of one upper side panel (E) as shown.
Installation (continued) 5 6 Attaching the back panel Installing the header □□ Attach the handles (GG) to the removable header (G) using the screws included on the handles (GG). Install the removable header (G) to the base cabinet (B) by pressing it firmly into position as shown. □□ Attach the upper back panel (C) to the base cabinet (B) using screws (EE). C G B EE B 7 GG 8 Installing the shelf pins □□ Open the right side door of the base cabinet (B).
Service Parts B A E D C F G Part Number Part Description Burnished Cherry Finish 248-85-58-Y Mocha Finish 248-85-73-Y Heritage Finish 248-85-65-Y Bleached Linen Finish 248-85-80-Y A Top Panel 20-12-460 20-12-503 20-12-496 20-12-489 B Base Cabinet 20-12-461 20-12-504 20-12-497 20-12-490 C Upper Back Panel 20-12-462 20-12-505 20-12-498 20-12-491 D Upper Front Panel 20-12-463 20-12-506 20-12-499 20-12-492 E Upper Side Panel 20-12-464 20-12-507 20-12-500 20-12-493 F
Questions, problems, missing parts? Before returning to the store, call Hampton Bay Customer Service 8 a.m.-6 p.m., EST, Monday-Friday 1-800-986-3460 HOMEDEPOT.COM/HDC Retain this manual for future use. Manufactured by: GHP Group, Inc. • 6440 W. Howard St.
Núm. de artículo 205107798, 205107836, 205107860, 205107712 Núm. de modelo #248-85-58-Y, 248-85-80-Y, 248-85-65-Y, 248-85-73-Y GUÍA DE USO Y CUIDADO CHIMENEA ELÉCTRICA LUDLOW ¿Tiene preguntas, problemas, o faltan piezas? Antes de regresar a la tienda, llame a Servicio al Cliente de Home Decorators Collection de lunes a viernes de 8 a.m. a 6 p.m., hora local del Este 1-800-986-3460 HOMEDEPOT.
Tabla de contenido Tabla de contenido. . . . . . . . . . . . . . . . . . . . . . . . . . . . . . . . . . . 2 Garantía. . . . . . . . . . . . . . . . . . . . . . . . . . . . . . . . . . . . . . . . . . . 3 Lo que está cubierto . . . . . . . . . . . . . . . . . . . . . . . . . . . . . . . . 3 Lo que no está cubierto. . . . . . . . . . . . . . . . . . . . . . . . . . . . . . 3 Pre-instalación. . . . . . . . . . . . . . . . . . . . . . . . . . . . . . . . . . . . . . 4 Instalación . . . . . . . . . . . . . . .
Garantía GARANTÍA DE 1 AÑO LO QUE ESTÁ CUBIERTO El fabricante garantiza que su nueva chimenea eléctrica está libre de defectos de fabricación y materiales por un periodo de un año a partir de la fecha de compra, sujeto a las siguientes condiciones y limitaciones. Las variaciones en el color real de la madera y los acabados que pueden resultar de las características naturales de la madera, como patrones de grano, marcas minerales y cosas semejantes, no son considerados defectos.
Pre-instalación PLANIFICACIÓN DE LA INSTALACIÓN Antes de comenzar a ensamblar este producto, asegúrese de que todas las piezas estén presentes. Compare las piezas con la lista de contenido del paquete y herraje incluido. Si hace falta alguna pieza o se encuentra dañada, no intente ensamblar el producto.
Pre-instalación (continuación) CONTENIDO DEL PAQUETE B A E D C F G Pieza Descripción Cantidad A Panel superior 1 B Gabinete de base 1 C Panel trasero superior 1 D Panel frontal superior 2 E Panel lateral superior 2 F Repisa ajustable 4 G Cabecera removible 1 5 HOMEDEPOT.COM/HDC Póngase en contacto con el 1-800-986-3460 para recibir más ayuda.
Instalación 1 2 Instalación de los conectores □□ Coloque un panel frontal superior (D) y un panel lateral superior (E) sobre una superficie limpia y plana. Instale dos conectores cortos (BB) en el panel frontal superior (D) usando pernos (AA). Instale un conector largo (CC) y cuatro conectores cortos (BB) en el panel lateral superior (E) como se muestra usando pernos (AA). Repita usando el panel frontal superior (D) y el panel lateral superior (E).
Instalación (continuación) 5 6 Instalación del panel trasero Instalación de la cabecera □□ Instale los mangos (GG) en la cabecera removible (G) usando los tornillos incluidos en los mangos (GG). Instale la cabecera removible (G) en el gabinete base (B) presionándola firmemente en posición como se muestra. □□ Instale el panel trasero superior (C) en el gabinete base (B) usando tornillos (EE).
Piezas de servicio B A E D C F G Número de pieza Pieza Descripción Acabado de Cerezo Pulido 248-85-58-Y Acabado de Mocha 248-85-73-Y Acabado de Herencia 248-85-65-Y Acabado de Lino Desteñido 248-85-80-Y A Panel superior 20-12-460 20-12-503 20-12-496 20-12-489 B Gabinete de base 20-12-461 20-12-504 20-12-497 20-12-490 C Panel trasero superior 20-12-462 20-12-505 20-12-498 20-12-491 D Panel frontal superior 20-12-463 20-12-506 20-12-499 20-12-492 E Panel lateral superior
¿Tiene preguntas, problemas, o faltan piezas? Antes de regresar a la tienda, llame a Servicio al Cliente de Hampton Bay de lunes a viernes de 8 a.m. a 6 p.m., hora local del Este 1-800-986-3460 HOMEDEPOT.COM Conserve este manual para uso futuro. Fabricado por: GHP Group, Inc. • 6440 W. Howard St.