
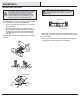
Instructions / Assembly


7
HOMEDEPOT.COM/HOMEDECORATORS
Please contact 1-800-986-3460 for further assistance.
Assembly - Standard Ceiling Mount
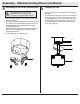
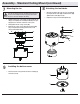
Routing the wires
Assembling the fan
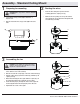
Preparing for mounting
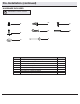
□ Route the wires exiting the top of the fan motor
assembly (G) into the coupling cover (F).
□ Make sure the slot openings are on top and route the
wires through the canopy (C) and then through the ball
and downrod (E) assembly.
2
3
1
□
□
□
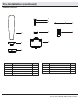
CAUTION: To ensure wobble-free operation and to avoid
damage to the fan, the downrod (E) and the set screw
(GG) must be completely tightened.
WARNING: Make sure power is off before attempting
installation.
□ Loosen the two canopy screws (AA) located in the “L
shaped” slots.
□ Remove and save the two canopy screws (AA) in the round
holes.
AA
AA
C
C
E
F
G
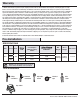
Loosen the set screws (GG) in the downrod coupler until the inside
of the channel is clear of the screw tip.
Remove and save the lock pin (FF) on
the end of the downrod (E).
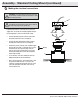
Slide the ceiling canopy (C) onto the downrod (E) followed by the
coupling cover (F).
Attach the downrod (E) into the coupler until the lock pin (FF) can
be inserted through the hole in both the rod and coupler.
Tighten both set screws on the coupler.
Insert the lock pin (FF) through the hole in the
coupler and
downrod (E) then attach the hitch pin (EE) on the other side.
□
□
□
C
E
F
G
GG
FF
EE