36HF100GRG /36HF100GRG-01 47HF100GRG /47HF100GRG-01 USE AND CARE GUIDE ELECTRIC FIREPLACE Questions, problems, missing parts? Before returning to the store, call Home Decorators Collection Customer Service 8 a.m. - 6 p.m., EST, Monday - Friday 1-800-986-3460 HOMEDEPOT.COM/HOMEDECORATORS THANK YOU We appreciate the trust and confidence you have placed in Home Decorators through the purchase of this electric fireplace. We strive to continually create quality products designed to enhance your home.
Table of Contents Safety Information...................................................... 3 Warranty...................................................................... 4 Pre-Operation............................................................. 5 Pre-Assembly.............................................................. 6 Hardware Included ................................................... 6 Product Specifications........................................................ 6 Tools Required.................
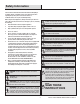
Safety Information Please read and understand this entire manual before attempting to assemble, operate or install the product. If you have any questions regarding the product, please call customer service at 1-800-986-3460, 8 a.m.-6 p.m., EST, Monday-Friday. When using electrical appliances, always follow basic precautions to reduce the risk of fire, electrical shock, and injury to persons, including the following: 1. Read all instructions before using this appliance. 2.
Warranty 1 Year Limited Warranty: The manufacturer warrants this product to be free from manufacturing and material defects for a period of one year from date of purchase, subject to the following conditions and limitations: 1. Install and operate this Electric Fireplace in accordance with the installation and operating instructions furnished with the product at all times. Any unauthorized repair, alteration, willful abuse, accident, or misuse of the product shall nullify this warranty. 2.
Pre-Operation 1. Remove the product identification sticker from the front of the fireplace and the twist-tie from the logset. GRG lo: 47HF100 dèle / Mode Model / Mo N #: AB-12345-A S for service! umber Keep this n méro pour le service! u Gardez ce n número para servicio! te Mantega es Twist-tie Product Identification Sticker 2. Attach the Product Identification Sticker to this Manual below for future reference. This information is used for product registration and also is necessary for customer service.
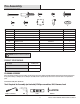
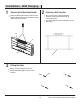
Pre-Assembly HARDWARE INCLUDED AA BB FF GG CC HH Part AA BB CC DD EE FF Description Anchor Screw Wall Anchor Screw 4mm x 8mm (2 Pre-Attached) Screw 4mm x 6mm (3 Pre-Attached) Screw Flat Head Screw GG HH II JJ Screw (Pre-Attached) Wall Bracket Small Base Bracket Washer DD EE II JJ Part Number 3647HF-AA 3647HF-BB 3647HF-CC 3647HF-DD 3647HF-EE 3647HF-FF Quantity 4 4 4 8 7 2 3647HF-GG 3647HF-HH 3647HF-II 3647HF-JJ 2 4 1 4 NOTE: Hardware not shown to actual size.
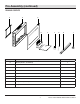
Pre-Assembly (continued) PACKAGE CONTENTS B A C D Part Description E F G H I Quantity A Mounting Bracket (Pre-Attached) 1 B Fireplace 1 C Front Frame 1 D Base Bracket 1 E Base 1 F Remote Control 1 G Decorative Rocks H Transparent Tray Assembly I Fireglass Varies 1 Varies 7 HOMEDEPOT.COM/HOMEDECORATORS Please contact 1-800-986-3460 for further assistance.
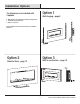
Operation Installation Options Option 1 The fireplace can be installed with 3 options: Wall Hanging....page 9 1. Wall hanging to the wall with provided mounting bracket. 2. Stand with the pedestal base. 3. Built in construction. Follow installation instructions below based on installation preference. Option 3 Option 2 Built in construction....page 13 Pedestal Base....page 12 8 HOMEDEPOT.COM/HOMEDECORATORS Please contact 1-800-986-3460 for further assistance.
Operation Installation - Wall Hanging WALL HANGING TO THE WALL WITH PROVIDED MOUNTING BRACKET Your new electric fireplace may be installed virtually anywhere in your home. However, when choosing a location be sure to follow the general instructions included. For best results install out of direct sunlight. Power supply service must be either completed or placed within the electric fireplace prior to finishing to avoid reconstruction.
Operation Installation - Wall Hanging 1 2 Removing the Mounting Bracket Remove the Mounting Bracket (A) from the back of the Fireplace (B) by removing the two pre-attached Screws (CC) at the top back of the unit. Choosing a Wall Location Choose a wall location to attach the Mounting Bracket (A). Position the Mounting Bracket (A) in the desired location. Use a level to align the bracket and mark the four holes with a pencil.
Operation - Wall Hanging (continued) Operation Installation 4 5 Attaching the Mounting Bracket Attach the Mounting Bracket (A) to the wall by fastening the four Anchor Screws (AA) into the wall anchors. Hanging the Fireplace Hang the Fireplace (B) on the hooks at the bottom of the Mounting Bracket (A) and push the Fireplace (B) into the Mounting Bracket (A). Re-fasten the two screws removed in Step 1.
Operation - Pedestal Base Installation 1 2 Fastening the Base Bracket Use four Screws (EE) and four Washers (JJ) to fasten the Base Bracket (D) to the Base (E). Attaching the Small Base Bracket Use 1 Screw (DD) to fasten the Small Base Bracket (II) to the Fireplace (B). D E B DD II JJ EE 3 Attaching the Base Bracket Fasten the Base Bracket (D) to the Fireplace (B) with the provided Screw (EE). B EE D 12 HOMEDEPOT.COM/HOMEDECORATORS Please contact 1-800-986-3460 for further assistance.
Operation - Pedestal Base Installation 4 Fastening the Base Bracket Use 1 Screw (EE) to fasten the Base Bracket (D) to the Fireplace (B). B D 5 E EE Secure the Top Frame Mount Front Frame (C) to the Fireplace (B) by hooking the clips into position. Tighten the 2 Screws (CC). Continue to the fuel bed setup instructions (Page 18 ). C B D E 13 HOMEDEPOT.COM/HOMEDECORATORS Please contact 1-800-986-3460 for further assistance.
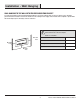
Operation - Built In Construction Installation BUILT IN TO A WALL INSTRUCTIONS This fireplace is a zero clearance design. No combustibles can be placed on the top surface of the fireplace. Combustibles may be installed to the edge of the unit. Insulation and vapor barrier should be placed a minimum of 2 inches from the unit. Build the framing according to the specifications shown in the below table & figure 1. Model A B C D E F G H I J K L 36HF100GRG / 36HF100GRG-01 32.8” 18.6” 3.
Operation - Built In Construction (continued) Installation 1 2 Removing the Stickers Remove the black stickers. Fastening the Brackets Fasten the Wall Brackets (HH) with Screws (DD). DD Black stickers 3 HH Steps 3 to 6 describe optional installation for removing the power cord and changing to hard wired Remove the pre-attached Screw (DD) holding the junction box cover. Loosen the three screws holding the wires and remove the Negative, Live and Ground wires.
Operation - Built In Construction (continued) Installation 4 5 Loosening the Strain Relief Bracket Remove the two pre-attached Screws (DD) holding the power cord strain relief bracket. Fastening the Brackets Remove the power cord and strain relief assembly. Strain Relief Power Cord Assembly 6 Connecting the Power Supply Wire Connect the power supply wire. G Terminals G Terminals 16 Power Supply Cord HOMEDEPOT.COM/HOMEDECORATORS Please contact 1-800-986-3460 for further assistance.
Operation - Built In Construction (continued) Installation 7 8 Installing the Fireplace Secure the fireplace to the wall using Anchor Screws (AA). Hanging the Front Frame Hang the Front Frame (C) on the Fireplace (B) and gently push on the lower part of the frame until it snaps into place. B C AA 9 Securing the Top Frame Hooks Secure the top frame hooks with the two retaining Screws (CC). B CC C 17 HOMEDEPOT.COM/HOMEDECORATORS Please contact 1-800-986-3460 for further assistance.
Operation Fuel Bed Setup Instructions 1 2 Removing the Logset If you wish to remove the logset, unscrew the two Screws (GG) securing the emberbed. Removing Logset and the Black Stickers Remove the logset and the black stickers on both sides. Black stickers Emberbed with logset GG 3 Placing Transparent Tray Place the Transparent Tray (H) inside the Fireplace (B). H 18 HOMEDEPOT.COM/HOMEDECORATORS Please contact 1-800-986-3460 for further assistance.
Operation Fuel Bed Setup Instructions (continued) 4 Tightening the Screws 5 Removing the Tray Cover 7 Placing Fireglass or Rocks Tighten the Screws (FF) on both sides. Carefully pull the tray tabs to remove the tray cover. FF 6 Removing the Tray Cover Remove the tray cover. Place the Fireglass (I) or the Rocks (G) as desired. Follow steps 5 and 6 in reverse to re-install the tray cover. B over C Tray G I 19 HOMEDEPOT.COM/HOMEDECORATORS Please contact 1-800-986-3460 for further assistance.
Operation Indicators Control Panel The fireplace can be operated by either the remote control or the control panel. 20 HOMEDEPOT.COM/HOMEDECORATORS Please contact 1-800-986-3460 for further assistance.
Operation (continued) 1 Powering the Fireplace 2 Push the Power button to supply power to all functions of the fireplace and put the insert in a standby mode. Push the Power button again to turn off all functions. Adjusting the Spectrafire Flame There are six brightness levels that can be selected. Settings 6 - 4 decrease in Spectrafire brightness. Settings 3 - 1 decrease in Amber only flame brightness.
Operation (continued) 7 Replacing the Remote Control Battery 8 Disposing of Used Batteries The battery may contain hazardous substances that could endanger the enviroment and human health. When the remote control stops operating or its range seems reduced, it is time to replace the battery with new ones. On the back end of the remote, press and slide the battery door open and remove the old battery. Insert 2 AAA batteries, checking that the + and sides of the battery match inside the battery compartment.
FCC/IC Information This equipment has been tested and found to comply with the limits for Class B digital device, pursuant to part 15 of the FCC Rules. These limits are designed to provide reasonable protection against harmful interference in a residential installation.
Troubleshooting PROBLEM Display shows “E1”. Display shows “E2”. POSSIBLE CAUSE CORRECTIVE ACTION The thermostat sensor is broken Unplug the fireplace, remove the back panel of the fireplace and check or disconnected. that the thermostat is plugged into the main circuit board. If this does not solve the problem contact customer service for a replacement thermostat sensor. The thermostat sensor is Contact customer service for a replacement thermostat sensor. broken. Display shows “E3”.
Replacement Parts For replacement parts, call our customer service department at 1-800-986-3460, 8 a.m.-6 p.m., EST, Monday-Friday. Part Description 36 HF Qty. 47 HF Qty.
Questions, problems, missing parts? Before returning to the store call Home Depot Customer Service 8 a.m. - 6 p.m., EST, Monday-Friday 1-800-986-3460 HOMEDEPOT.COM/HOMEDECORATORS RETAIN THIS MANUAL FOR FUTURE USE.