
Installation Instructions
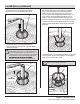
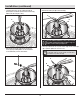
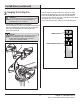
Table Of Contents

9
Installation (continued)
□ Carefully feed the fan’s electrical wiring through the
motor housing cap (G), then install the cap as shown.
□ Carefully feed the fan’s electrical wiring through the
center arm support (E), then install the support (E) with the
cupped side facing up.
□ This step is needed only if you are installing your ceiling fan
using an extended-length downrod (not provided) and have
installed the center arm support (E) from the previous step.
If you are using the downrod (B) provided in this package, or if
you are using an extended-length downrod but chose not to
install the center arm support (E), skip this step and proceed
directly to installing the canopy screw cover ring (D) and canopy (C).
□
□
CUP SIDE UP
E
M
NOTCHED
OPENINGS
Carefully feed the fan’s electrical wiring through the canopy screw
cover ring (D) and canopy (C), then install the cover ring (D) and
canopy (C) on the downrod (B) as shown.
Carefully feed the fan’s electrical wiring through the center arm
support cover (M), then install the support with the cupped side
facing down.
HOMEDEPOT.COM/HOMEDECORATORS
Please contact 1-800-986-3460 for further assistance.
NOTE: If you do not intend to use the decorative arms (F)
supplied with this ceiling fan, you can skip this step because
the center arm support (E) will not be needed. However, if you
are installing using an extended-length downrod (not provided),
you may still wish to use the center arm support (E) and the
appearance, even when not using the decorative arms (F).
NOTE: Make sure the notched openings on the rim of the
canopy screw cover ring (D) are facing up.
C
D
G