
Use and Care Guide

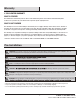
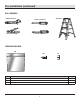
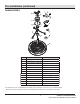

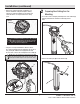
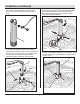
Table Of Contents
- 22inch Windara LED Ceiling Fan Manual - V1_部分1.pdf
- 22inch Windara LED Ceiling Fan Manual - V1_部分2
- 22inch Windara LED Ceiling Fan Manual - V1_部分3
- 22inch Windara LED Ceiling Fan Manual - V1_部分4
- 22inch Windara LED Ceiling Fan Manual - V1_部分5
- 22inch Windara LED Ceiling Fan Manual - V1_部分6
- 22inch Windara LED Ceiling Fan Manual - V1_部分7
- 22inch Windara LED Ceiling Fan Manual - V1_部分8

6
Installation
1
Installing The Ceiling Fan Mounting
Bracket Assembly
shock, or personal injury, turn off power to room
and wall switch by removing fuses or turning off
circuit breakers as needed before beginning
installation.
WARNING: Mount fan only to a metal outlet box
marked acceptable for fan support and use only
the mounting screws provided with the outlet
box. Plastic outlet boxes and outlet boxes
commonly used for the support of lighting
and may need to be replaced. If you are unsure
whether your outlet box is appropriate or
uncertain about the proper method for mounting
□
□□
If your installation site does not have an existing
UL-listed metal outlet box, one must be installed
before proceeding. Make sure box is mounted directly
to the building structure using ceiling joist screws
provided with the box.
Once installed, there must be at least 7 ft. clearance
between the bottom of the ceiling fan and the floor.
Ceilings taller than 8 ft. may benefit from an extended
length downrod (not included) to achieve the best
results.
NOTE: Extended-length downrods longer than 48 in.
will also require a downrod wire extension kit (not
included, available from the retailer where you
purchased your fan).
Angled ceilings must not be steeper than 30 degrees from
the horizontal canopy.
□
□
30° max.
CEILING
□
□
□
□
The mounting bracket assembly (A), canopy (C), and the canopy
screw cover ring (D) are assembled together for shipping
purposes. If you haven’t already done so, separate these
pieces now.
Twist the canopy screw cover ring (D) counterclockwise to
release.
Loosen the two screws over the slots in the canopy (C).
Remove the two screws securing the canopy (C) to the
mounting bracket assembly (A), then twist the canopy (C)
counterclockwise to release from the other two screws.
D
C
A