
Installation Guide
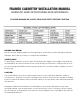


Blind Wall Cabinet
Top View
3” Filler
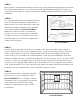
STEP 7:
Determine next wall cabinet to be installed and repeat
measuring, pre-drilling and installation but again, do not
fully tighten. Carefully align the face frames of each cabinet
with each other and “C”-clamp or “Quick-Grip” together
(ILLUSTRATION F). Drill a 3/32” pilot hole in three places
along hinge side of frame and secure with #8 x 2-1/2” trim
screws. Continue around the room until all wall cabinets have
been installed. Return to each cabinet for one last check of
level and plumb and tighten screws.
This same method of attachment is also to be used for
fillers. Fillers may need to be cut to size to fill an odd
open dimension between the cabinet and the wall. Hold
the filler in place where it is to be installed. Turn it over
and mark at top and bottom where it needs to be cut.
Connect the two marks using a straight edge and draw
a line to create your cut line. Once cut, install as described
above.
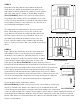
STEP 8:
Base cabinets are installed in much the same manner as
wall cabinets. Refer to your design layout to determine
what base corner cabinet to start with (if there is a corner
cabinet), and place it on the floor where it will be installed.
If your design includes a base easy reach or base easy
reach lazy susan (ILLUSTRATION G), measure from the corner to
the first wall stud and transfer this measurement to the inside of the base
cabinet. Repeat for next stud location. Now measure down 3/4” from inside
top of cabinet and intersect these measurements with the stud location
measurements. Drill through the base cabinet back using a 3/32” drill bit.
Repeat process for adjacent corner back panel. Move cabinet into place and
check for level and plumb. Shim where necessary and fasten the cabinet to
the wall with #10 x 2-1/2” pan head screws but do not fully tighten.
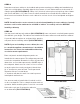
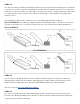
If your design includes a blind base cabinet
(ILLUSTRATION H) instead of a base easy reach corner cabinet, consult your
design to determine the distance the cabinet is to be installed from the wall
corner. Always measure distance using the front frame width of the cabinet and
not the end panel width of the cabinet. Place cabinet on floor where it will be installed and repeat all
measuring and pre-drilling as detailed in Step #7. Move cabinet into place and check for level and
plumb. Shim where necessary and fasten the cabinet to the wall with #10 x 2-1/2” pan head screws
but do not fully tighten.
C-clamp
Floor
Wall
Level
ILLUSTRATION F
ILLUSTRATION G
ILLUSTRATION H