
Installation Guide


STEP 11:
You are now ready to install any moldings included in your design. Crown moldings give your kitchen
a custom look so, take your time and measure carefully. We recommend a miter box or compound
miter saw to ensure accurate cuts. Remember, the proper position for cutting molding in a miter box
or compound miter saw is upside down with the bottom edge of the molding resting against the
miter box fence.
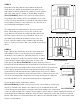
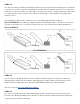
Your cabinetry features a full overlay door, use of molding support strip is required
(ILLUSTRATION K). Your cabinetry supplier may have included this strip so be sure to check for it.
If it was not included, a 1 x 2 can be secured to the top of the cabinets for molding attachment
(ILLUSTRATION L).
STEP 12:
It is now time to reinstall all shelves, doors, drawers and roll-out trays. Consult your cabinetry
manufacturer’s website for door/drawer adjustments procedures. Make sure that all doors and
drawer fronts are adjusted to your satisfaction BEFORE installing decorative hardware.
Take a look at our Care and Adjustment Guide.
STEP 13:
You can now safely remove the wall cabinet support strips and patch any screw holes in wall.
Consult your cabinetry manufacturer’s website for initial care and cleaning instructions and begin
enjoying your new kitchen cabinetry!
ILLUSTRATION L
Finished
End
8”
Molding
1 X 2
3”
1” X 2”
2
5/8
”
Finished
End
Molding
8”
1 X 2
ILLUSTRATION K
3”
1” X 2”
2
5/8
”