
Use and Care Manual

2
Assembly and Installation
Option 3 – Installing the light on a wall using
plastic anchors
Connecting the wires
□ Using the included template, mark the correct locations for mounting.
□ Use a 1/4 in. drill bit to drill holes for the plastic anchors (D).
□ Insert the plastic anchors (D) into the holes and tap flush with the
mounting surface.
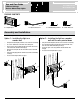
□ Find a location to mount the lamp body (A). Position the lead wire into
the notch at the bottom of the base.
□ Secure the lamp body (A) with the self-threading screws (C).
□ Connect the quick connector (B) to the female terminal in the
lamp body (A).
□ Proceed to Connecting the Wires.
WARNING: The wire connector (C) contacts have sharp
edges for piercing the main low voltage cable. To avoid
injury, do not touch the metal contacts.
CAUTION: The wire from low voltage power unit should be
12-16 AWG type underground low Energy Circuit Cable.
IMPORTANT:
Protect the wiring by routing it in close
proximity to the light fitting, or next to a building structure such
as a house or a
deck. The landscape wire and connector can
also be hidden under stone or buried under grass at a
maximum depth of 6 in. (15.24 cm). Do not install the fixture
within 10 ft. of a pool, spa, or fountain. Do not submerge the
fixture in water.
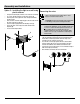
□ Place the wire connector (B) on opposite sides of the low voltage
cable (not included) from the transformer (not included) where the
fixture will be located. Align and fit the main low voltage cable
vertically to the slot of the wire connector (B).
□ Press the wire connector (B) together until it is locked around the
main low voltage cable. The pre-set prongs will pierce the cable
insulation and establish contact with the electrical wire inside.
□ Once the wire connector (B) is in place, it is recommended to wrap it
with electrical tape (not included).
□ After all fixtures are installed, turn on the transformer.
A
B
C
D
B