
Installation Guide
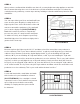

STEP 5:
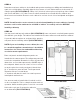
Attach 1 x 2 furring strips to wall studs directly below
the “wall cabinet bottom level line” with wood screws
(ILLUSTRATION C). These temporary support strips
will help to support the weight of the cabinets during
installation, and ensure that the cabinets are level. You
are now ready to begin the cabinetry installation. It is
recommended that you remove all doors, drawers,
shelves and roll-out trays from each cabinet prior to
installing to prevent damage. Consult your cabinetry
manufacturer’s website for door/drawer removal and
adjustments. For ease of installation, begin by installing wall cabinets first.
Take a look at our Care and Adjustment Guide.
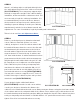
STEP 6:
Refer to your design layout to determine what wall
corner cabinet to start with (if there is a corner
cabinet), and place it on the floor below where it will
be installed. Measure from the corner to the first wall
stud and transfer this measurement to the inside of
the wall cabinet. Repeat for next stud location. Now
measure down 3/4” from inside top of cabinet, and
3/4” from inside bottom of cabinet and intersect these
measurements with the stud location measurements.
Drill through the wall cabinet back using a 3/32” drill
bit. Repeat process for adjacent corner back panel.
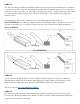
Raise cabinet into place resting on temporary rails
and fasten the cabinet to the wall with #10 x 2-1/2”
pan head screws but do not fully tighten. Check for
level and shim where necessary (ILLUSTRATION D).
You may also construct a support wood “T” brace to
hold the front edge of cabinet in place until you have
attached to wall (ILLUSTRATION D1).
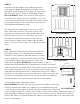
If your design includes a blind wall cabinet
(ILLUSTRATION E) instead of a wall corner cabinet,
consult your design to determine the distance the
cabinet is to be installed from the wall corner. Always measure distance using the front frame width
of the cabinet and not the end panel width of the cabinet. Place cabinet on floor below where it will
be installed and repeat all measuring and pre-drilling as detailed in Step #5. Raise cabinet into place
resting on temporary rails and fasten to wall with #10 x 2-1/2” pan head screws but do not fully
tighten. Check for level and shim where necessary.
Furring strips
Floor
ILLUSTRATION C
Floor
Shim
ILLUSTRATION D
ILLUSTRATION EILLUSTRATION D1
Blind Wall Cabinet
Top View
3” Filler