
Installation Guide

The Magellan Group, LTD. • 4317 Santa Ana Street, Suite A • Ontario, California 91761
(800) 582-7021 • www.woodlandhomedecor.com
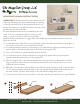
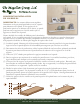
HORIZONTAL RAIL INSTRUCTIONS
IMPORTANT: Shelving should be anchored securely into
wall studs. Mounting rails are pre-drilled with 16" spacing
to line up with wall studs. If the pre-drilled holes do not
line up with studs, you can drill new holes in the rail so that
the holes line up with wall studs.
We have included wood screws for installation into wall
studs. If it is not possible for all holes to line up with
studs, or you do not wish to drill new holes, please
purchase hollow wall anchors or toggle bolts. The smaller screws included are used to secure the
shelf onto the rail.
(1) Locate wall studs. Hold the mounting rail firmly against the wall in the desired location, place a
level on top of the rail to assure that the rail is level.
(2) To mark the drilling locations, use the sharp tip of a thin drill bit, applying moderate pressure to
make a mark on the wall through each of the holes in the support rail.
(3) Use a 5/32" drill bit to drill the marked holes in the wall.
(4) For holes that require a hollow wall anchor or toggle bolts, please follow the instructions
provided with the anchors that you have purchased.
(5) Place the support rail on the wall and install screws through each hole. Remember to install a
large wood screw where there is a stud and the wall anchors screws where there is not a stud.
Tighten all screws securely.
(6) Slide shelf over the rail so that the back of the shelf fits snugly against the wall. Using the small
1-1/4" screws provided, attach the shelf to the rail through the pre-drilled holes on the top of
the shelf surface. Hold the shelf firmly to the wall while installing these screws.
(7) Cover the screw holes on the top surface of the shelf with the peel and stick cover caps included.
S
TUDS
SCREWS
SCREWS