
Installation Guide

The Magellan Group, LTD. • 4317 Santa Ana Street, Suite A • Ontario, California 91761
(800) 582-7021 • www.woodlandhomedecor.com
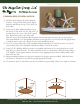
CORNER SHELF INSTALLATION
(1) Hold the shelf against the wall in desired
location. Using a level and a pencil, lightly
mark the wall along the top of the shelf, on
both walls.
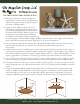
(2) Using a level, draw a light pencil line from
the corner of the shelf out 10" and 3/16" of
an inch below the “top of the shelf ” pencil
line. Repeat this step on the other wall.
Place the top of the installation block against this line and mark the screw holes, by pressing a
thin, sharp drill bit (or a thin phillips screwdriver) through each of the holes with enough pressure
to make a mark on the wall. Repeat for the other installation block.
(3) For a 12" corner shelf, each of the installation blocks should be 4" from the corner. For an 18"
corner shelf, each of the installation blocks should be 5" from the corner.
(4) Using a 5/32" drill bit, drill holes in the four marked wall locations. For holes that hit on a wall
stud, do not re-drill the holes. For holes that did not hit on a wall stud, re-drill the holes using a
1/4" drill bit. Insert plastic anchors into these holes, tapping them in with a rubber mallet until
flush with the wall.
(5) Mount installation blocks over the holes using the four large screws provided. Slide shelf onto
the blocks so the back of the shelf fits snugly against both walls.
(6) To attach the shelf to the blocks, use the two small screws provided. Place cover caps over screws.
SCREWS
Small Wood Screws