
Installation Guide


Page 2 of 5
heating and/or air conditioning systems should be operating at
least five days preceding installation to promote proper
acclimation and should be maintained during and after
installation. If it is not possible for the permanent heating
and/or air conditioning system to be operating before, during
and after installation, a temporary heating and/or
dehumidification system that simulate normal living (occupied)
conditions can enable the installation to proceed until the
permanent heating and/or air conditioning system is fully
operational.
Your job site should have a consistent temperature of 60°F-
80°F and relative humidity of 40%-60% which should be
maintained continuously thereafter.
Basements and Crawl Spaces
Concrete slab or ground must be dry. The ground in the crawl
spaces must be completely covered using 6 mil black
polyethylene. Crawl space clearance between the earth and
underside of joists should be no less than 18 inches and the
perimeter vent area should be equal to 1.5% of the total square
footage of the crawl space or as mandated by code.
Subfloor Preparation
All sub-floors must be prepared for installation in accordance
with normal subfloor preparation procedures and accepted
tolerances within the wood flooring industry. Check the sub-
floor to see if it specifically meets the following requirements:
Dry - Concrete slabs must be at least 60 days old and the
moisture content cannot exceed 3lbs./1000 sf under a Calcium
Chloride test. The moisture content of the concrete floor must
not exceed 3.9% with use of a Tramax Concrete Moisture
Encounter Meter. Also the RH levels in the Concrete using in-
situ Probes (ASTM F207-02) should not exceed 75%. If the
moisture level of the concrete subfloor cannot be determined
or if levels exceed the desired parameters then the use of a 6
mil polyethylene film vapor barrier (perm rating of .13 or less)
is mandatory. Wood sub-floors must not exceed 13% moisture
content and the moisture content difference between the sub-
floor and the flooring material must not exceed 4%.
Flat - Floor must be even with a maximum tolerance between
1/8” over 6 ft or 3/16” in a 10 ft radius. (2mm per 2.5 meters)
Clean and structurally sound - Free of debris and any other
loose material. Wood sub-floors must be stable and securely
fastened to supporting joists. Be sure to nail or screw any areas
that are loose or squeak. Sand, scrap, or grind any raised edges
and level all low spots with the appropriate leveling compound
(Concrete floors included) so that maximum tolerances are
met.
Radiant Heat – Use of an approved wood flooring water or
electrical radiant sub floor heating system is approved when
installed either within or above the concrete / wood sub-floor.
The heating system should be run 3 to 4 days prior to the
installation at a reduced temperature of 64F (18c). Two days
after the installation is complete, the temperature of the
system may be raised gradually over a one week period to its
desired operating temperature. Please note that the surface
temperature of flooring should never exceed 81F (27C). Adding
humidification may be necessary to maintain humidity levels at
required levels. Always follow the flooring manufacturers’
recommendations when it comes to radiant heat.
Installation
Elastilon can be used over any structurally sound sub-floor or
just about any existing flooring material. Lay it right over any
wood, concrete, vinyl tile or sheet, ceramic, or any other FLAT
stable material. Do not install over any type of carpeting.
Begin by deciding the best layout of the floor for the room. It is
best to start along the longest wall in the room. Remember that
this is a free floating floor and an expansion space at least 5/8”
(16 mm) must be maintained around all walls and stationary
objects. In many cases it may be possible to undercut the
Sheetrock (drywall) to allow for additional expansion room.
Expansion joints will also need to be installed in doorways, long
hallways, and larger areas more than 33 ft (10m) in length
following the direction of the small width (eg. 3 ½” width) of
the floor boards. Additional Expansion joints are not necessary
in the direction of the long length of the floor boards (and
expanses longer than 33 ft (10m) are permitted because a
small amount of white carpenters glue (PVA) needs to be
applied to all adjoining ends joints. (small ends of boards
only)
Where necessary cut the door casings to allow the bamboo to
slide underneath. Baseboards should never be fastened directly
to the floor itself and may need to be raised to allow the
flooring to slide underneath. If not raised, a small molding can
be added to conceal the expansion gap after the installation is
complete.
Measure the room to determine the number of rows of flooring
needed. If the last row is narrower than 1 ½” (4 cm) in width
then reduce the starting board accordingly. When installing the
flooring please be sure to follow the manufacturer’s
recommendations for board placement.
Over all concrete applications especially below grade, always
install an approved 6 mil polyethylene film vapor barrier before
laying the Elastilon. For concrete floors that are on-grade or
above-grade, if the moisture parameters are higher than the
required levels or the moisture levels cannot be determined, a
6-mil polyethylene film vapor barrier must be installed. All
joints of the vapor barrier need to be overlapped by at least 8”
(20cm) and sealed with a moisture resistant tape. Allow the
vapor barrier to run up the walls 3-4” (8-9cm). The excess can
be trimmed once the installation is complete.
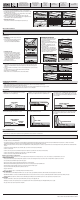
Roll out the Elastilon (white protective film / smooth side up)
perpendicular ( at right angle ) to the direction of the
flooring. The rolls should be tight side by side with no overlap.
Be sure to cover the entire work area with Elastilon. Do not
tape the long edge of the Elastilon rolls together. They must be
free to move. The short end (3ft / 1m side) of the Elastilon roll
can be taped together to maintain alignment.
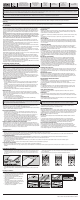
There are several methods of starting your installation.
Starter strip method: The first method involves creating a
folded over flap of protective film. When you roll out the
Elastilon you will need to add a little extra product (2 ½ x width
of boards) running up the wall where you’re going to start your
project. Peel back the white vinyl protective film the width of 2