
Installation Guide


Page 3 of 5
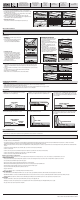
½ planks and cut off the Elastilon material below it (leaving the
white protective film folded over). This protective film is the
starter strip which now should be positioned up against the
wall where you intend to start laying the floor. (see illustrations
below) The extra Elastilon that was cut off can be used at a
later point in the installation or on a future installation. Simply
place a leftover piece of the white protective foil over the
exposed adhesive until it is ready to be used.
Direct placement method: The second method creates the
starter flap as you start installing the first two rows. Cover the
entire floor with Elastilon (wall to wall). Along the starting wall
peel back the protective film (approximately 2 ½ times the
width of your first board) to expose the adhesive layer of
Elastilon. Set your first row of boards across the full length of
the starting wall. Do not apply downward pressure on the
boards until you are certain that this row is straight and true.
As long as you do not put pressure on the on the boards they
can be readjusted. Once you are sure that the row is straight
and you have maintained the necessary expansion gap, you can
press down on this row.
Return the protective film to within ½” (12mm) from the end of
this first installed row of flooring and begin placing your second
row of bamboo over the developing flap of protective film. This
new larger starter strip can be sued to continue the installation.
Protective film method : This method uses any protective film
that may be available. Use the white vinyl protective film that
was removed from the installation. With the Elastilon rolled
out, peel and fold back the white vinyl protective film the width
of 2 ½ planks along the wall you will be starting at. (Do not cut
the Elastilon or the film) The adhesive layer will be exposed.
Fold a piece of the extra white vinyl protective film in half and
place it onto the exposed adhesive layer with the crease facing
the starting wall. Be sure that this temporary folded strip
extends well onto the original peeled back section. This
temporary fold is now the starter strip where you will begin to
build your floor.
Installing your Bamboo flooring has
never been easier!
Remember, the flooring needs to be perpendicular (at right
angles) to the rolled out Elastilon with the tongue edge facing
out from the wall. (Boards can be installed in either direction if
desired)
Place an expansion spacer of at least 5/8” (16 mm) at the start
of the row and remember to maintain this gap on all other
stationary walls and objects
With the white protective film starter strip now folded back
over the Elastilon, begin assembling the next rows of flooring
over this folded strip from side wall to side wall. The end joints
should be staggered by the wood manufacturers’
recommendations and/or industry recommendations. A small
amount of white carpenters glue (PVA) needs to be applied to
all adjoining ends joints (small butt joint). Be sure to clean any
glue residue before it dries.
Ensure that the floor boards are fitted together tightly and
straight. When the row is in position, apply forward pressure
to the boards so that the joint between the rows remain
seamless, and then simply pull the white protective starter strip
out from under the board to the edge of the flooring being
careful not to expose the adhesive face. If this occurs, just tuck
the protective foil back under the edge of the already installed
floor board. Finally, apply pressure to the top of the flooring to
secure it firmly to the Elastilon. Do not use mechanical
fastening systems such as straps to force boards together. It is
permissible to use blue painters tape to keep board alignment
as you continue to build the floor on the release film.
It is recommended that you confirm with a chalk or laser line
how straight your installed floor is. The floor can still be
adjusted so that it is square to the room. To remove a board,
simply tuck the protective film back under the board and pry it
up slowly until it releases from the adhesive surface. You can
now reinstall or replace the remove board.
Please note that it is possible to remove an installed floor board
for only a brief period after it has been installed on Elastilon.
Once the adhesive has set (approximately 20 minutes) the only
means to remove a board is to cut out the piece in question
and replace it by gluing the four sides of a new board back in
place. Be sure to place a piece of Elastilon underneath the new
board so as to ensure a level surface with the rest of the floor.
After the first few rows are installed cleanly, you can lay up
multiple rows of flooring. Be sure to tap each board tightly
together and to apply forward pressure as you pull the white
protective film from under the flooring. Continue to press down
on the installed floor as you lay the floor wall to wall.
Remember, you can use the excess bamboo flooring material
from the last end cut as the first board in the next row so as to
minimize waste. Also, as you pull off the protective film, it can
be rolled up or folded for future use.
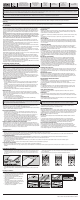
To fasten a sliding door to the floor, mark the location of the
screw holes that are on the bottom rail and drill a hole that is
5/8” (16mm) wide. The bottom rail can then be fastened to the
sub-floor below. The rail width should cover the drilled holes.
Once the floor has been completely installed, remove the
expansion spacers and trim any excess poly to the floor level.
To cover the expansion gaps, install / reinstall all baseboards
and add appropriate moldings as needed.
If installing unfinished flooring, it can be sanded immediately
after installation. If it is a pre finished floor, furniture can be put
back as well. It is recommended to put weight on the floor (as
easy as walking over it), to help the floor adhere to the Elastilon
evenly
Clean the floor with the appropriate cleaner and attach felt
protection pads to the legs of the furniture. Always follow the
flooring manufacturer’s maintenance guidelines for proper care
of your floors.