
Installation Guide


Page 4 of 5
Special Notes:
The Elastilon Strong self adhesive installation system has been
engineered to work with many species of wood flooring. It is
important that the manufacturers / industry recommendations
are followed before, during and after the installation with
adherence to both room conditions and site preparation. The
Elastilon instructions must be closely followed as well.
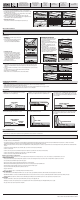
Long Length boards- Remember as you build the floor on
the protective release strip, you will have the choice to change
or move boards so that the fit is to your liking. Elastilon can be
used with long length (8 feet/ 2.44m) as well as short length (12
inch/.30m) boards. Be sure to follow the manufacturers’
recommendations in terms of mixing floor boards to optimize
the look and strength of the floor. Once you are satisfied with
the presentation of the floor remove the protective release
strip and move on to the next section.
Flooring that isn’t perfect - It is also important to visually
inspect each piece of flooring before being installed. As with
any other type of installation method, Elastilon cannot
compensate for flooring that is severely bowed warped,
cupped or damaged prior to an installation. However, most
boards may be used if the defective section is cut and removed
with the remainder of the board used as a start or end piece,
used in a closet or in a low traffic or used in a concealed portion
of the room. Please note that the use of mechanical fastening
systems such as straps should never be used to force boards
together. Pressure from a rubber mallet and the use of blue
painters tape to keep boards tight is permissible. (Remember
never to strike the upper surface of the flooring as this could
lead to surface defects) During the racking ( building) of the
floor on top of the Elastilon protective release strip, flooring
that is not severely bowed can be installed as long as it can still
be inserted into the T&G of the boards surrounding it. This will
pull the board straight and allow full contact on the Elastilon
membrane. Be sure to place a small amount of carpenters glue
on all four sides of the affected board for a concern free
installation.
Floor Noise – Deflection may cause a minimal amount of
friction or “floor Noise”. Note that normal floor noise will vary
from one installation type to the next depending on the sub-
floor type, sub-floor deflection, species, milling and type of
flooring material, relative humidity and the amount of topside
pressure applied to the flooring material. For these reasons,
“floor Noise” is not considered a defect.
Working with thinner boards – Although these instructions are
common to the installation of Elastilon with all hardwood and
bamboo floors, particular attention must be given to the
following when installing thinner boards. (ie, ½”/12.5mm, 3/8”/
10mm and 5/16”/ 8mm)
• All end joints must be glued throughout the
installation.
• The floor must be flat to within .08 inch over 8 ft
(2mm over 2.5m). Uneven floors can lead to
increased floor deflection with narrower and/or
thinner floor board installations.
• Expansion room must be maintained around all walls
and obstacles.
Helpful Tips:
• Elastilon is designed as a floating installation system.
Do not permanently fix or attach product to the
subflooring or install under permanent cabinetry.
• Maintain the proper expansion around room
perimeter and around “fixed” cabinetry.
• Expansion joints will need to be installed in doorways,
long hallways, and larger areas more than 33 ft (10m)
following the direction of the width of the floor
boards. Additional expansion joints are not necessary
in the direction of the long length of the floor boards
(expanses longer than 33 ft (10m) are permitted).
Glue all end joints.
• Elastilon alone is not a moisture barrier and will
require a separate moisture barrier such as 6mil
sheet plastic to be placed over cement, ceramic tiles
or similar.
• Where necessary, undercut door jams or casings to
allow the flooring to float freely and to expand and
contract.
• To promote best board bonding into the adhesive top
layer, remove any trace of dust from the back of the
boards after making cuts.
• Be selective with board choice and do not install
miss-milled boards, imperfect boards, cupped,
twisted or bowed boards.
CHECK THE SUBFLOOR
• Subfloor flatness is very important. Subfloor deviation
must not exceed 1/8” in a 6’ radius or 3/16” in 10’.
(1/8”is equal to a grain of rice), (3/16” = three
stacked quarters).
• All floors must be stable and clean as well as dry to
NWFA/Flooring manufacturers’ specifications. For
complete details please refer to the Installation
Guidelines and Methods published by the National
Wood Flooring Association (NWFA). Additional
application information is available at
www.NWFA.org
ACCLIMATION/CONDITIONING OF THE FLOORING
• All wood products are affected by environmental
conditions/fluctuations especially prefinished
materials. Therefore acclimate the new flooring in the
areas to be installed to normal lived-in conditions
while in the boxes.
• If products are protected in plastic or to speed up
acclimation, open the ends of the boxes. To prevent
board warping, twisting or bowing, do not cut the
outside plastic support packaged bindings until ready
to install.
• Length of acclimation time is not the determining
factor. The goal is to reach an indoor equilibrium or
balance between the “core” of the new flooring with
its surroundings before assembly or installation. This
balance could be achieved in as little as 1 to 5 days, or
longer for some exotic species