
Installation Guide
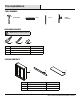


B
C
CC
AA
the cabinet hangs securely.
NOTE:
It is best to find a stud in your wall to ensure
4
Installation
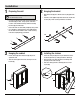
1
Preparing the wall
□ Place the bracket (B) against the wall and determine your
desired hanging location. Using a pencil, mark three
locations on the wall that match up with the mounting
bracket’s (B) pre-drilled holes.
Ensure the marks are horizontally straight by using a level.
Use a hammer to gently punch the anchor (AA) halfway
into the wall at each marked location. Finish screwing
in the anchors (AA) with the screwdriver.
□
2
Hanging the bracket
□ Align the bracket (B) holes with the anchors (AA) against the
wall.
Insert the screws (BB) through the bracket holes and into the
anchors (AA). Finish screwing in with the screwdriver.
□
□
X
3
A
□ Insert four shelf pins (CC) into four pre-drilled holes at the
desired height of the top shelf (C) inside the cabinet (A).
Repeat for the lower shelf with the four remaining shelf
pins (CC) and the other shelf (C).
Slide each shelf (C) into the cabinet (A) above each set
of pins (CC).
□
□
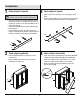
4
Installing the shelves
A
Hanging the cabinet
□ Lift the cabinet (A) above the bracket (B) and place it
against the wall.
Slide the cabinet (A) down the wall, hooking it onto the
bracket (B).
□
B
X
X
B
AA
BB
C