
Installation Guide

MAINTENANCE TIPS
Aswithanyooringmaterial,generalcleaningtechniquesofporcelainandceramictiledependonthe
surface,textureandconditionofthesurface.Waterandasoftspongewillusuallybeenoughtoclean
the surface of M S International ceramic and porcelain products.
If you clean with something other than water, however, opt for a neutral pH cleaner that will not affect
thenish.Youcanndneutralcleanersatmosthomecentersandtileshowrooms.Alwaystestthe
cleaneronasmallarearst.Iftileorstoneisheavilysoiled,werecommendthataprofessional
cleaning company determines the proper cleaning technique.
Page 2 of 2Porcelain Installation Guide
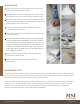
INSTALLATION
1. Begin laying the tile from the center of the room, using
your reference lines as your guide.
2. Spread thinset with the notched edge of a trowel. Larger
tiles require more thin set and a larger notched trowel.
3. As you lay your tile, you can use plastic spacers to help
ensure you have straight grout lines. You will remove the
spacers before the thinset dries.
4. Clean up any excess thinset immediately using the
manufacturerʼs instructions.
5. After a few rows of tile are installed, set them with a tile
level and a mallet.
6. As you reach the perimeter of the room, cut and adjust
tiles to complete your installation. A wet cut tile saw is
recommended for cutting porcelain. Do not dry cut
using motorized equipment due to the potential for
exposure to harmful silica dust. Use a wet saw or a
score and snap tool when cutting is necessary during
the installation process.
7. Allow the tile to set according to the manufacturerʼs
instructions. Grout the tile.
8. Clean the tile surface with a damp sponge and
clean water.
1 2
3
6
7
5
8
4