
Instructions / Assembly
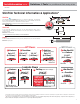

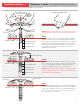
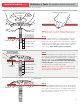

Side View of Hand Positions
Installationadvice.com Solutions & Tools for problems that may arise
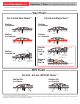
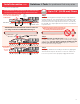
SlimTrim as a REDUCER - OPTIONAL DOWEL INSTALLATION
Step 7
When finished applying adhesive, start again at the beginning
of the molding and push dowels all the way in until molding is
secure. Once molding is in place, use a rubber mallet to tap on
the top of each dowel. Use the pencil marks to reference
where each dowel is located.
Sub Floor
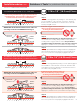
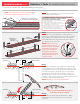
Step 6
Once the molding touches the highest of the 2 floors, insert
the tip of a glue gun under 1 edge that will rest on the lower
floor. Apply Liquid Nails or any polyurethane constructive
adhesive under the molding. Before applying glue, put
painter’s tape on the floor and the side of the molding
receiving the glue. Then push/tap molding down until
it touches the floor. Carefully remove tape.
NOTE: Make sure you apply adhesive to ONLY 1 side
of the molding and that all surfaces that the adhesive
touches is dust and debris free.
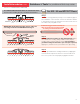
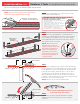
Second Pass (1/4”)
Third Pass (1/4”)
Forth Pass (1/4”)
Fifth Pass (1/4”)
First pass (1/4”)
PUR-Glue
adhesive
Apply Painter’s Tape
to floor & molding
prior to applying glue
Pencil marks
Second Pass (1/4”)
Third Pass (1/4”)
Forth Pass (1/4”)
First pass (1/4”)
Step 5
Using both hands, start at one end and gently push molding
1/4”down. Make sure dowel is straight and that you apply
pressure directly over dowel. The best position is to hold dowel
with pointer and middle fingers and push down with thumbs.
Moving down the molding again, push the dowels in the floor
1/4” at a time. Keep molding level as you tap it in.
Sub Floor
Push down directly
over dowel 1/4”
at a time
NOTE: Do not try to push the entire molding in all at once
by just pressing it in from top! This will bend the dowels.
10