
Troubleshooting Guide

Charging
● Shade should be charged prior to use. This will ensure battery life is maximized.
● Charge shades that are not frequently used at least once a year to maintain battery health. Even when not in use, lithium batteries slowly discharge. If
● left uncharged for too long, battery may suffer permanent loss of ability to hold charge.
● Charging may be done with a regular USB wall adapter or power bank. Note that the charging for motor is a 5Volt / 1A charging port.
Cleaning
● Shade fabric is polyester and should only be gently spot cleaned with a cloth. Use any cleaning agent on small surface before applying to larger area
Troubleshooting Guide
1-877-592-5233
HOMEDEPOT.COM/HUBSPACE
Questions, problems, missing parts? Before returning to the store, call
Hubspace Customer Service
8 a.m. - 7 p.m. EST, Monday-Friday, 9 a.m. - 6 p.m. EST, Saturday
Maintenance
Troubleshooting
Issue
Shade does not go up or down
Possible Cause
Shade moves when manually
pressing the up/down buttons
on the motor housing but not
with remote or Hubspace app
Shade goes up when I press
the down button or down
when I press the up button
Shade orientation is
backwards (happens most
often when mounting the
fabric over the roll instead
of under the roll)
Shade is not correctly
paired to remote /
Hubspace app
Shade battery is running
low
Shades may have
different power charge
levels or different sizes
Multiple shades are paired
to the same remote or
zone in Hubspace app
Shade is not fully charged
Shade is turned off
Shade is raising or lowering
slower than normal
Different shades raise / lower
at different speeds
Shade is responding to
commands when trying to
control other shades
The upper (or lower) limit
of the shade is set
incorrectly
When I try to raise (or lower)
my shade, it just toggles up
(or down) a bit then stops
Suggested Solution
Verify battery is fully charged. See instructions for charging shade.
Verify motor switch is in “on” position. Test shade by pressing “up” or “down” button. Shade should
respond if powered and switched on
Follow instructions for remote pairing or use with Hubspace app (gateway required for use with app)
Re-charge shade fully (recommend charging overnight). As battery level becomes low the shade speed
may vary.
Re-charge all shades. As battery levels drop it is possible speed may vary. Larger shades may also raise at
different speed compared to smaller ones.
Remove unwanted existing pairing on shade by following the “Remove pairing” instructions in Instruction
manual
Motor is setup to run in wrong direction, please follow instructions for reversing roll direction of shade
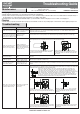
Reversing Roll Direction (only needed for over-the-roll direction shade install)
3s
Long press the motor [up] [Down] key for 3 seconds
to enter the learning/pairing state. Motor will jitter
and the LED will be long lit.
①
Hold the [channel left selection]+[Stop] button
simultaneously. After the signal has been received,
the motor will shake once and the motor LED will
blink 3 times.
②
Reset the upper (or lower) limit
●
Follow instructions for putting shade in pairing mode
●
Follow instructions to reset upper (or lower) limit
Modifying shade settings/limits for existing paired shades
Please note that this function can also be performed in Hubspace smart app once
enabled. To avoid other shades from being interfered with while setting upper and
lower limits, turn the on/off switch to the “off” position for all shades that are not in
limit setting mode. Only applicable for remote control that is already successfully paired
with existing shades. Useful for adjusting the top and bottom shade limits. On the
remote control that has paired successfully, long press the [channel setting] button of
the remote control for 4 seconds. The motor of the shade will jig, and the shade LED
will begin flashing and shade will be sent into pairing mode.
4s
Setting upper shade limits
Long press the [Channel setting]+[Up] buttons
together for 4 seconds to enter setting mode for the
upper limit. The motor will jig and the LED will light up.
4S
Hold the [channel setting] button for 4 seconds
to complete defining the lower limit. Note that
pairing mode will time out after 3 minutes of
inactivity.
②
Setting lower shade limits
Long press [Channel setting]+[Down] buttons together
for 4 seconds to enter setting mode for the lower limit.
The motor will jig and the LED will light up.
Inch the blind by long pressing or short pressing
the [Up] or [Down] button to the desired lower
limit position.
②
①
①
4S
Retain this manual for future use.