
Instructions / Assembly


MITER CUT INSTALLATION
Installationadvice.com Solutions & Tools for problems that may arise
VersaEdge Stair Nose
Use the 2x4 miter sample to see if your stair is a true
90 degree corner, often they are not, and you will have
to adjust your mitercut by increasing or decreasing
your angle accordingly, just make sure you are cutting
both pieces with the exact same angle, otherwise your
cuts will not line up!!!
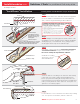
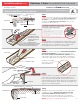
STEP 1 - MAKE TEST CUTS ON SCRAP 2x4
IMPORTANT: Make sure the bevel angle is set to ZERO (A).
We highly recommend you do a test cut on 2 scrap pieces of 2x4
to make sure your cuts line up. Set the miter angle to 45 degrees
for the first cut (B). Cut the 2x4 (C).
Then change angle of miter cut to 45 degrees in the other direction
(D). Cut the other piece of 2x4.
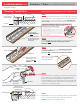
Line up ends of the 2x4s to form a corner (E). Check the pieces to see
if they line up correctly with no gap on the top or front view (F).
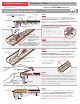
STEP 2 - CUT YOUR VERSAEDGE (VE)
IMPORTANT: Use a scrap 2x4 piece to set VE on while you
make the cuts (G). This will keep the VE level while you cut.
Set the miter angle to 45 degrees. Make your cut (H).
IMPORTANT: Hold the molding extremely tight, otherwise it
will pull in the direction of the blade and your cut will be off
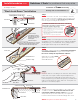
Change miter angle to 45 degrees in the other direction (I). Again,
make sure you hold the molding extremely tight. Don’t let it
move while you make the cut. Cut the other piece of VE.
Check the 2 molding pieces to see if they line up correctly with no
gap on the top or front view (J).
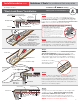
STEP 3 - APPLYING VE TO THE STAIRS
After wiping the VE clean from debris, turn the moldings over and
remove the backing paper from the tape (K).
Line up the ends of the moldings to form a corner. Place a piece of
painter’s tape between them to hold them together so you can test
the fit (L).
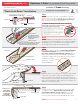
Test the fit on your stairway. Make sure there is no gap between the
moldings (M).
After you test the fit, run a thick line of Titegrip adhesive (or
comparable PUR adhesive) along the inside of each molding (N).
Put the molding in place, pressing down firmly to make sure it is in
contact with the floor or stair tread (O). Make sure the edge is square.
While pressing both ends firmly together, stretch a piece of painter’s
tape tightly across the corner edge to keep the moldings from
separating while the adhesive cures (P). Let the adhesive cure for at
least 4 hours before any walking on it. For exposure to full traffic,
wait 24-48 hours. NOTE: Complete cure takes 48 hrs.
IMPORTANT: Make sure to use safety goggles and thick gloves while using saw and handling the blade
45°
C
G
45°
I
M
O
15
30
0
A
45°
D
F
J
L
N
45
50
40
25
20
10
3
B
P
24
24h
24h
45°
H
K
E