
Instructions / Assembly


Installationadvice.com Solutions & Tools for problems that may arise
Flooring
Adhesive Tape
with Release Paper
Still Applied
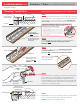
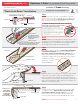
Step 5
Let the adhesive cure for at least 4 hours before any walking
on it. For exposure to full traffic, wait 24 to 48 hours.
NOTE:
Complete cure takes 48 hours.
Step 4
Touch the bottom of molding to the stair riser and carefully
roll the stair nose in place. Make any final adjustments
before you push the molding all the way down. Once it’s
in the final position, press down firmly with your hands and
make your way down the entire stair nose. It may take 2 or
3 passes to set it firmly in place.
Stair RiserBottom of
Stair Nose
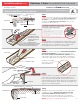
PUR Adhesive
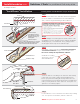
Step 3
Next, apply a generous bead of a Premium Polyurethane
Construction Adhesive along the entire inside corner.
Be sure to NOT to overlap the tape with the adhesive.
PUR Adhesive
Caulk Gun
Adhesive Tape with
Release Paper Still
Attached. DO NOT
REMOVE!
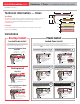
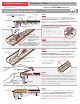
Step 1
Install the riser flush to the stair. Cut a 1” wide strip of your floor.
Drill, counter-sink, screw and glue it flush to the stair riser. Install
flooring 0.375” from the glued down 1”strip. DO NOT glue
flooring down. Clean flooring and molding as directed below:
Step 2
Turn VersaEdge after following the cleaning preparation
above. DO NOT peel the release paper off the
adhesive tape.
VersaEdge Surface
Roughened up with
Sanding Sponge or
Sandpaper
Release Paper
DO NOT REMOVE!
VersaEdge Stair Nose
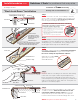
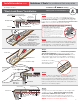
CLEANING PREPARATION FOR BOTH SURFACES
Preparing the floor & molding as outlined is mandatory
to achieve the required bonding strength
1. Use a damp cloth (water only) to clean both surfaces of loose
particles or surface films.
2. Roughen the surfaces with sandpaper (100-150 grit), sanding
sponge or metal brush. For flooring, only roughen up area that
will be covered (1.25” to 1.5”).
3. Degrease both surfaces to remove all traces of oil, grease, dust,
and fingerprints by using a light solvent such isopropyl alcohol
(Refer to the manufacturer’s recommendations for additonal
safe cleaning agents).
4. Let both surfaces dry thoroughly before applying adhesive.
Roughen up surface that
comes in contact
with glue
Painter’s
Tape to
protect rest
of ooring
Flooring
Stair Riser
Sub Floor
0.375”1” Piece of
Flooring Nailed
& Glued Down
Flooring
Glue
Sub Floor
Glue
“Floating” Installation
Flooring with an overall thickness of up to 19 mm (0.75”)
3
Underside of molding
generously covered
with PUR adhesive