
Use and Care Manual

Installation Instructions
Rigid Vinyl Plank
For
Assistance, Call: 1-714-685-7568
www.homedepot.com/homedecorators
Grade Levels
Above Grade / On Grade
Below Grade
Installation Method
Click Lock
HOMEDEPOT.COM/HOMEDECORATORS
Please contact 1-714-685-7568 for further assistance.
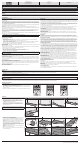
3. INSTALLING THE LAST ROW
a. For the last row, align the plank to be used on top of the 2nd to last row. Using a full
width plank as a spacer, trace the wall contour. Use a full plank as a straight edge to cut
the plank. Insert the long edge tongue into the long edge groove and use a pull bar and
hammer to close the gap.
b. After tapping the long side joint closed, close the short edge joints using a tapping block
or pull bar.
3a3a 3b
4. INSTALLING UNDER DOORWAY FRAMES
a. When the new ooring meets a threshold or a doorway, we recommend undercutting the
door jamb. To secure the right cut, turn a plank upside down and place it on the oor up
to the door frame. Then place a reciprocating saw at against the plank and simply cut
through the frame. Remove the cut-out piece and vacuum away debris. Slide the plank
under the pre-cut door frame. Door frame should be cut so that a 1/4 in. (6 mm) gap is
located from the edge of the plank under the casing to the wall.
b. Tap the long side joint closed rst, then tap the end joint closed.
4a 4b
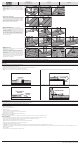
5. INSTALLING AROUND FIXED OBJECTS
a. Allow 1/4 in. (6 mm) expansion space around pipes or other xed objects.
b. In rows where there is a pipe, make sure the pipe falls exactly in line with the short side
of two planks. Select a drill bit with the same diameter as the pipe plus 1/2 in. (13 mm).
Click the planks together on the short side and drill a hole centered on the joint between
the two planks. Then install the planks.
c. For a double pipe, drill a hole equivalent to the diameter of the pipe plus 1/2 in. (13 mm)
at each of the marked points. If located on the long side of the plank, make a 45º cut
from each hole to the edge of the plank. Then, using an appropriate glue along the cut
edges of the piece you cut out, glue the piece in place. Be sure no glue comes between
the cut-out piece and the suboor.
5a 5b 5b
5c 5c 5c 5c
6. FINISHING THE INSTALLATION
a. Remove all spacers.
b. Fill any expansion spaces around potentially wet areas (such as refrigerators, tubs, etc.)
with premium, waterproof 100% silicone caulk.
c. Remember, the use of coordinating T-Molds is required when installing ooring in a
room or area that is larger than 100 lineal feet (30.5 meters) in any direction, so that the
oor is separated into sections that are no larger than 100 ft. x 100 ft. (30.5 meters x
30.5meters) per section.
d. Install moldings to cover the expansion gap. When installing moldings, never allow nails
or screws to enter the ooring or the expansion zone around the ooring perimeter. All
moldings and transition strips need to provide a 1/4 in. (6 mm) expansion space as well.
Note: Coordinated moldings can be purchased on homedepot.com. Follow molding
installation instructions for proper installation.
6a 6b 6c 6d
NOTE: Rooms larger than 1500 sq. ft. (50 ft. x 30 ft.) require the use of coordinating T-molding transitions. Doorways and archways less than 4 ft wide also require the use of T-molding transitions.
NOTE: Save any leftover planks/tiles. Do not discard as they are color matched (dye-lot) to your oor. They can be used for replacement in the event you need to replace a plank/tile in the future.
Accessories
Pictures are for general illustrative purposes only. Actual products may differ from pictures.
□ Clean the oor.
□ Install or reinstall all wall trim pieces. Nail them through the wall, but not to the suboor to avoid restricting the expansion gap.
□ Install transition trim pieces. Nail them to the suboor, not the ooring.
□ At doorways, transitions should be used to protect the edges of the oor and to provide a decorative transition from one oor type to another.
□ If the oor is to be covered, use a breathable material such as cardboard. Do not cover with plastic.
T-Molding: Used to create a transition between oor coverings of similar heights or to cover an expansion gap.
T-MOLDING
FLOORING
FLOORING
Stair Nose: Used in conjunction with ooring installed on stair steps or nished edges of a higher level oor like in a sunken living room.
FLOORING STAIR NOSE
RISER
STAIR TREAD
Hard Surface Reducer: Used to transition to another hard surface ooring of different heights such as tile, vinyl, or concrete.
HARD SURFACE
REDUCER
RESILIENT
FLOOR
FLOORING
Quarter Round: Used to cover the expansion space between the wall base and your ooring. It can also be used to make smooth transitions between the
oor and cabinetry. It can be used with or without wall base molding. Ensure you nail the quarter round to the wall and not the ooring, as shown.
FLOORING
QUARTER ROUND
WALL
Care and Maintenance
DAILY MAINTENANCE
□ Sweep, dust, damp mop, or vacuum your oor regularly to remove any particles that could cause abrasion or scratch your oor.
CAUTION: Vacuums with a beater bar or power rotary brush head can damage a oor and should never be used.
□ Use a damp mop to remove spots and soil. Use any high-quality, pH-neutral vinyl cleaner. Alternatively, use a non-rinsing, biodegradable cleaner that leaves no residue or haze.
□ Do NOT use detergent based cleaners.
□ Do NOT use an abrasive mop and shine products.
□ Do NOT ammonia or bleaches.
□ Do NOT use steel wool or scouring powder which will scratch the oor.
□ Do NOT use any dust cleaners, as they may cause your oor to become slick or damage the nish.
□ Avoid spills of paints, dyes, or harsh chemicals.
□ Avoid long term exposure to direct sunlight. Use window treatments or UV tinting on windows.
BRANDED OR OFF-THE-SHELF FLOOR CARE PRODUCTS
If none of the above are effective and you choose to use a store bought product, test the product in a non-conspicuous area (i.e., closet, corner, or scrap pieces) for potential adverse side effects.
PREVENTATIVE MAINTENANCE
□ Protect your oor when using a dolly for moving furniture or appliances. Protective sheets and/or plywood may be needed. Never slide or roll heavy furniture or appliances across the oor.
□ Use at oor protectors (nylon or felt) on all furniture legs. Clean protectors periodically to remove grit that may become embedded and cause scratching.
□ Avoid excessive exposure to water from being tracked in during periods of inclement weather.
□ Minimize abrasive material and dirt by placing mats on both sides of exterior doors and by using area rugs in high-trafc areas
□ Rearrange furniture and rugs periodically to avoid uneven color and shade changes from light exposure.
□ Use protective mats beneath rolling chairs and keep furniture casters clean.
□ Use NON-RUBBER backed mats at all entrances to reduce the walk-off residue from asphalt driveways as well as prevent dirt and grit from being tracked onto your oor. Rubber backed mats can discolor your oor.
□ We recommend the use of a hard surface (non-studded), non-rubber chair mat to protect your oor from ofce chairs with casters. Light, rolling furniture should be outtted with broad-surface, non-staining casters that have been engineered for hard surface oors. Such casters should be a minimum of 1 in. (2.5 cm)
wide and at least 2 in. (5.1 cm) in diameter.
□ Keep pets’ nails trimmed.
□ Remove shoes with cleats, spikes or exceptionally pointy heels before walking on the oor.