
Operation Manual


Home Easy Romote
Control Dimmer
Light Switches
V1.0
The HomeEasy series of remote control light
switchs allows you to control your lights
manually or using a HomeEasy remote
controls (Except HE-200). The dimmer
module is suitable for 1-way circuits. For 2-
way switching (or Multi-way switching)use
this master unit with any number of
dimming slave units (Contact Byrons directly
- see contact details).
RE-INVENTING THE HOME
HOME
easy
TRANSFORMERS:
- Use only with electronic transformers.
- To Calculate the Load, add the VA ratings of the transformer
(not the bulb wattage)
- Choose transformers with a maximum rating close to the lamp load
e.g. 50VA,, 60VA or 70VA to control a 50 W low voltage bulb
- Wire Wound and Toroidal transformers are not compatible with the HomeEasy
Light switch's (see compatibility), if connect the dimmer will immediately turn
off. If this occurs more than times the dimmer will block any further use, to
unblock the dimmer it will need to be disconnect from the mains supply then
reconnect (see installation guide).
Compatibility:
Compatible -
lighting products
non-compatible -
products
Over Load Protection:
The HomeEasy dimmer switch is design to self protect against over loading
and over heating, this can occur when bulbs age. The dimmer module will
automatically dim the light or turn the lights off completely until the excess
load is removed, to reset the dimmer from the protection mode switch the
lights off then on.
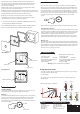
Installation Guide
HomeEasy Remote Control Master t:
1Gang 1-Way Circuits
N
L
Live
S
Lighting Load
2. Isolate the electrical supply to the lighting circuit.
3. Remove the existing switch and disconnect the wiring from the switch
terminals, take note of the wiring of the switch and the terminal markings.
Where there are two or more wires together in the old switch they must be
kept together in the new Home Easy dimmer.
4. Ensure that the wall (back) box has a minimum depth of 25mm and is free
from plaster or projecting screw heads. If using wall box with 4 fixing lugs,
the top and bottom lug must be removed to allow the dimmer switch to fit.
5. Connect the wiring as per the diagrams below, Additional slave units will
allow for 2-way operation, these additional units can only be operated
manually. Contact Byrons for your local distributor.
1. Remove the decorative front plate from the HomEasy Dimmer, place a small
screw driver into one of the side slots so that the screw driver is between the
inside edge of the front plate and the outer edge of the clear plastic and,
gently twist.
1Gang 400W Dimmer
2Gang 250W Dimmer
INSTALLATION WARNINGS:
BEFORE COMMENCING INSTALLATION
ISOLATE YOUR MAINS ELECTRIC SUPPLY
Read the instructions care fully before starting the installation process and keep
them for future reference. If you are in any doubt on the installation process,
consult a qualified electrician.
This product should be installed in accordance with the relevant sections of
the building
regulations code, and the current edition of the IEE Wiring Regulations
(BS 7671:Requirements for electrical installations) and appropriate statutory
regulations.
As of1 April 2004, new installations in the UK should be wired using the EU
harmonised colours for the supply conductors:
New colours:
BROWN = Live BLUE = Neutral Earth = Yellow/Green
Old colours:
RED = Live BLACK = Neutral
Electrical installations in bathrooms, kitchens, gardens, floor and heating systems,
swimming
pools, saunas and extra-low voltage lighting are classed as special installations and
must be certified by an approved competent electrical contractor conforming to
Part P, requirements of BS 7671:2001 and appropriate statutory regulations.
Fluorescent and compact fluorescent bulbs
Wire wound and Toroidal transformers
Electric Motors
Mains Voltage GLS or cable bulbs.
Dimmable Electronic Low voltage transformers
(see Transformer section)
GU10 and equivalent HI spot mains halogen bulbs
Installation Notes:
NOTE: Certain transformer types may not operate according to their stated
power rating when used with the dimmer switch, to avoid overloading of the
dimmer it will turn down the brightness of the lights. A digital transformer or
higher rated dimmer module may be required to resolve this problem.
N
L
Live
S
HomeEasy Remote Control Master unit
2-Way/Mulit-Way Circuits (Slave units will not operate with a HomeEasy
Reomte Control)
Live
S
Live
S
Lighting Load
Manual Operation Only Manual Operation Only
Slave 1
Slave 2
Live
S
Live
S
HomeEasy Remote Control:
2Gang Dimmer Switch with 2way and 1way
Live
S
N
L
Lighting Load =
NOTE: When using 2 gang dimmer switch, module A must be connected to
the lighting circuit. Module A will operate independently, Module B will only
operation when module A is connected.
A
B
Slave A
Manual Operation Only
Master Dimmer
Master Dimmer
Master Dimmer A
Master Dimmer B