
Installation Guide


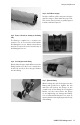
Table Of Contents
- Chapter 1: Introduction
- Chapter 2: Description of System Components
- Chapter 3: System Configuration and Sizing
- Chapter 4: Installation Practices
- Chapter 5: Sizing/Capacity Tables

Figure 3.3 10 PSI LP Gas First-Stage Regulator (Tank) to Second-Stage Regulator (House)
12
System Configuration and Sizing
Figure 3.2 2 PSI LP Gas Second-Stage Regulator To Garage, Outbuilding Or Appliance.
Step 1 Call 811 at least 3 days prior to digging to have any underground utilities marked prior
to digging.
Step 2 Determine length of gas piping from connection point at second stage regulator outlet
to riser outlet at the outbuilding or appliance. Include the distance required to connect the
riser to the gas piping system near the meter. This connection must be made using rigid pipe
or CSST that is at least the same size as the PE pipe size.
Step 3 Determine the number and type of HOME-FLEX
TM
Underground fittings that
are required in the system. Add the equivalent number of feet from Table 5.1 “Length to
Add to Each Run for Each Fitting” on page 20 of this guide to the number of feet calculated
above.
Step 4 Determine the appropriate LP Gas sizing table based on the Second-Stage Regulator
pressure and allowable pressure drop using the appropriate sizing table in Chapter 5
.
For example, Table 5.5 on page 24 can be used for low pressure LP gas with a pressure drop
of 0.5" w.c. Find the nearest length that is equal to or greater than the length calculated in
step above. Follow the row across until the number of BTU’s provided is equal to or greater
than the required BTU’s required for this run- check the column header for required pipe
diameter.
Elevated Pressure (10 PSI ) LP Gas
In this scenario, an underground polyethylene gas line is being run from the outlet of the
LP Gas tank’s First-Stage Regulator to the Second-Stage Regulator.
Step 1 Call 811 at least 3 days prior to digging to have any underground utilities marked prior
to digging.
Step 2 Determine length of gas piping from connection point of riser near first-stage regulator
outlet to riser outlet at the second stage-regulator. LP provider will make connection from
first stage regulator to riser.