
Installation Guide


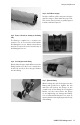
Table Of Contents
- Chapter 1: Introduction
- Chapter 2: Description of System Components
- Chapter 3: System Configuration and Sizing
- Chapter 4: Installation Practices
- Chapter 5: Sizing/Capacity Tables

HOME-FLEX Underground 17
Fitting Assembly Overview
Step 4 Push stiener into pipe
Push the stiffener all the way into the pipe
until the ridge is flush with the pipe end.
This can be done by hand, or gently tapped
in with a mallet if required.
Step 5 Ensure 3 threads are showing on the tting
body
The fitting is supplied in a ready-to-use
position. You do not need to disassemble
the fitting prior to use. Always ensure three
threads are exposed on the central body of
the fitting prior to use.
Step 6 Insert the pipe into the tting
Gently slide the pipe with stiffener into the
fitting until it stops. No force is required to
do this. Do not try to force the pipe further
into the fitting.
Step 7 Tighten the tting
While holding the end of the pipe into the
fitting with gentle force, tighten the nut
until the nut touches the flange on the
central body of the fitting. Do not tighten
further once the nut touches the flange
as over tightening can damage the fitting.
It is recommended that pliers are used to
ensure that the nut is tight against the body
of the fitting.