
Installation Guide

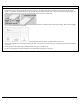
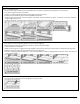
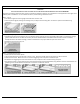
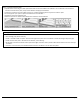

Table Of Contents
- WARNING: This product can expose you to formaldehyde gas which is known to the State of California to cause cancer. For more information, go to www.P65Warnings.ca.gov.
- WARNING: This product can expose you to formaldehyde gas which is known to the State of California to cause cancer. For more information, go to www.P65Warnings.ca.gov.
- WARNING: Drilling, sawing, sanding or machining wood products can expose you to wood dust, a substance known to the State of California to cause cancer. Avoid inhaling wood dust or use a dust mask or other safeguards for personal protection. For mo...
- WARNING: Drilling, sawing, sanding or machining wood products can expose you to wood dust, a substance known to the State of California to cause cancer. Avoid inhaling wood dust or use a dust mask or other safeguards for personal protection. For mo...
- CAUTION: ASBESTOS IN EXISTING FLOOR
- Home Legend product does not contain asbestos. Existing installed resilient flooring and asphaltic adhesive may contain asbestos fillers or crystalline silica. Do not sand, dry sweep, dry scrape, drill, saw, bead-blast, or mechanically chip or pulve...
- Tools and Materials
- Basics:
- Tape measure • Moisture meter (wood, concrete or both) • Chalk line & chalk • Hammer • Electric power saw • Carbide tipped saw blade for fine cut • NIOSH-designated dust mask • Hand saw or jamb saw • Eye protection • Straight edge or Spacers • Pry Bar...
- Additional Supplies for Glue-Down Method:
- Flooring adhesive • Trowels • Adhesive remover for selected adhesive • Clean rags • Weight roller • 3M Blue tape
- Technical Support
- Toll Free Number: 877-630-1800 or 877-960-8001
- Warranty

Doc. ID: 123 Rev: 5 Effective Date: 10-10-2018 Page | 8
Step 4 – Install the remaining Rows
• Spread another section of glue. Never spread more that can be covered before the adhesive is set. If adhesive is set and will not
transfer to the back of the plank, scrape off the adhesive and apply fresh adhesive.
• Continue to install the next rows. Make sure there is a random staggering at the end joints of at least 6” apart.
• Do not forget the 1/2” space for expansion between floor and the walls.
• Repeat the process for additional rows.
• Make sure that there is 100% contact between the wood floor and the adhesive.
Finishing Touches
• Clean the floor.
• Use matching putty where necessary
• Install or reinstall all wall trim pieces. Nail them through the wall, but not to the subfloor to avoid restricting the expansion gap.
• Install transition trim pieces. Nail them to the subfloor, not the flooring.
• At doorways, transitions should be used to protect the edges of the floor and to provide a decorative transition from one floor type
to another.
• If the floor is to be covered, use a breathable material such as cardboard. Do not cover with plastic.