
Installation Guide

Doc. ID: 186 Rev: 2 Effective: 1/7/2015 Page | 4
3
4
2
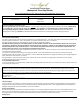
Step 3
• Install the product from left to right, across the room.
• Place the floor panel with the locking groove facing the room.
• Ensure there is expansion gaps. Between floorand the wall and all vertical fixtures during installation.
Step 4
• Place the short side tongue of the next floor panel at an angle into the short side groove of the first one and fold
down.
• Continue with the next floor panels in the same way.
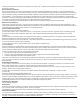
Step 5
• Place the final floor panel face up, locking groove long side towards the wall, and the short end tongue posi-
tioned 5/16 to 3/8 inch (about 5 mm) from the wall.
• Mark the place where the floor panel is to be cut.
• Make a cut in the floor panel on the decor side with a utility knife. Use the snap method to break the unneeded
part off. If it does not break cleanly, use the power saw with plastic cutting blade.
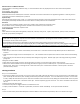
Step 6
• Stagger the end joints between rows at a minimum 12 inches.
• If you can, use the cut piece of floor panel from the previous row. If not suitable, take a new floor panel and cut
it in half.
• Place the floor panel at a low angle and insert the long side tongue into the locking groove of the floor panel in
the previous row.
• Fold the floor panel gently down.
Step 7
• Place the short end tongue of the next floor panel at an angle against the previously installed floor panel and
fold gently down.
• Ensure that the long side tongue is positioned on the locking strip of the previous row.
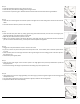
Step 8
• Using gentle force and at an angle, gradually, from left to right, push the long side tongue into the locking groove
of the previous row.
• You may need to lift the floor panel to the left of it slightly to allow for the ‘sliding action’.
• Complete the whole row in the same way.
5
6
7
8a
8b