
Instructions / Assembly
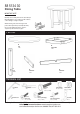

Assembly Instructions
2
IMPORTANT
* Please keep Hex Wrench in a safe place as you may need to tighten up the Head Cap Bolts in the future.
* Do not tighten up all the screws until each part is properly assembled.
* Use a soft cloth between these parts and the fl oor.
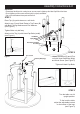
STEP 2
Attach Stretchers (D) and (E) to
unit with Head Cap Bolts (large)
and Wood Screw. (see Figure 2)
Tighten all Head Cap Bolts.
STEP 3
Turn the table over its’
upright position.
To the level the table,
adjust the adjustable levelers
on the bottom of the legs.
(see Figure 3)
B
E
B
A
B
B
B
C
B
C
B
C
B
C
B
D
Wood Screw
Head Cap Bolt (large)
Head Cap Bolt (small)
Steel Plate
Flat Washer
Spring Washer
Bolt
STEP 1
Place Top (A) upside down on a soft cloth.
Attach Legs (C) and Steel Plates to Top Frame (B)
with Bolts, Spring Washers and Flat Washers.
(see Figure 1)
Tighten Bolts only half way.
Attach unit to Top (A) with Head Cap Bolts (small).
(see Figure 1)
Figure 1
Figure 2
Figure 3
/2