
Operation Manual


6
GB
INSTRUCTIONS FOR USE:
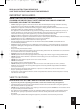
1. Ensure that the unit is unplugged before filling with water. Lift the carry handle into the full upright
position (Figure 2) and carry to a tap. Fill with warm water to the fill line located on the inside of the tub
(Figure 1). When finished, carry tub to a flat, stable surface for use and place handle in resting position
(Figure 2).
NOTE: Heat will only maintain the temperature of water placed inside the foot spa. It will not heat cold
water. For a warm water massage, fill the unit with warm water.
2. Plug the unit into a 220-240V power supply.
3. Sit down. With the touch of your toe, press the on/off button (Figure 1) to enjoy a warm bubble massage.
The LED will illuminate to indicate it has been selected. Place your feet in the spa. Press again to turn the
feature off.
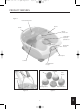
4. To use the Pull-Out Pedicure Tool (Figure 1):
a. Select the desired attachment from the covered storage (Figure 1):
Dry Heel Reducer: Removes rough spots and reduces dry skin on your heels
Course Pumice: Exfoliates the heels and balls of your feet to smooth and soften dry skin
Fine Pumice: Gently exfoliates to provide a smooth finish
Nail Brush: Use to cleanse and exfoliate your feet
Nail Buffer: Smooths and shines nails
b. Simply place the attachment on the pull-out pedicure center post (Figure 1).
c. Press the on/off button on the tool (Figure 1).
d. When finished turn the tool off and remove the attachment. Place the attachment back
into the covered storage area and close the lid.
e. Using the Side Tabs (Figure 1) lift the Comfort Gel Footrest out of the center console
(Figure 1).
Place the Pull-Out Pedicure Tool and cord back into console and secure to suction cup.
f. Put Comfort Gel Footrest back into console.
5. Enjoy a deep massage by sliding feet back and forth over the Sea Grass™, or you can remove the Sea
Grass™ and rejuvenate with the accu-pressure surface on the foot spa floor.
6. To empty: First, unplug the unit. Lift the carry handle into the full upright position and take the footbath to
the closest drain.Tip the unit, allowing water to pour out along the spout.
DO NOT pour water over the control panel (Figure 1).
IB-HL200B-0710-01.qxd:Layout 1 15/7/10 12:41 Page 6