
Automobile - Car User Manual


2 of 2
00-901
10. Reassemble the differential using the new clutch
assembly and the new shim.
• If the new differential clutch set came apart
during shipping, go to step 11.
• If the new differential clutch set did
not
come
apart during shipping, go to step 12.
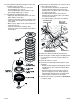
11. Assemble the new differential clutch.
• Apply fresh Dual Pump Fluid to the new clutch
plates and the clutch discs.
• Install one clutch plate and one clutch disc in the
clutch guide, then install the clutch hub into the
clutch guide.
• Make sure the splines of the clutch hub and the
clutch discs line up.
• Install the clutch plates and clutch discs
alternately until you have installed eleven plates
and ten discs.
12. Reinstall the rear differential in the reverse order of
removal. Note the following.
• For 1997 models, replace the rear differential
mounting bracket. Replace and reroute the
breather tube to the driver’s side of the vehicle
(see Parts Information).
• For 1998 models, replace and reroute the
breather tube to the driver’s side of the vehicle
(see Parts Information).
• For 1999 models, no new parts are required.
13. Fill the rear differential with Dual Pump Fluid.
14. Start the engine. Hold the engine at 3,000 rpm with
no load (in Park or Neutral) until the radiator fan
comes on.
15. Raise the vehicle on a hoist.
16. Circulate the Dual Pump Fluid through the clutch
assembly:
• On A/T models: Apply the parking brake, put the
transmission into D
4
, and let the vehicle idle for
10 minutes.
• On M/T models: Put the transmission into 1st
gear and engage the clutch. Slowly apply the
parking brake until just before the engine stalls.
Let the engine run like this for 10 minutes.
17. Test-drive the vehicle as you did in the DIAGNOSIS
to verify the repair.
NEW BREATHER
TUBE ROUTING
OLD (’97-’98)
BREATHER
TUBE ROUTING
REAR DIFFERENTIAL
MOUNTING BRACKET
REAR
DIFFERENTIAL
FORWARD