
Remote Starter User Manual

10 of 21 AII 38216-38957 (0802) © 2008 American Honda Motor Co., Inc. - All Rights Reserved.
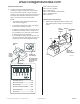
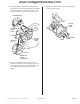
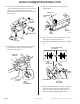
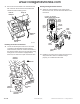
34. Install the four relays to the engine starter harness
relay blocks. Be careful to install the relays
properly, or a malfunction will result.
Routing the Engine Starter Harness
33. Attach the 3 A fuse labels to the engine starter
harness fuse case, and the 40 A fuse labels to the
fuse block.
6D01031T
CLIP
LAYOUT OF RELAYS
WHEN VIEWED FROM FRONT
40 A FUSE
LABEL
3 A
FUSE
LABEL
FUSE
BLOCK
RELAY
BLOCK
4-PIN RELAY
(black)
4-PIN
RELAY
(black)
5-PIN
RELAY
(green)
FUSE
CASE
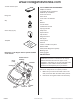
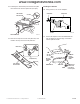
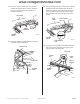
Installing the Control Unit Bracket
32. Locate the small square hole next to the small
round hole in the dashboard support bracket.
Under the dash, attach the control unit bracket to
the vehicle bracket near the front lower pillar using
a flange nut. If the vehicle is equipped with a
moonroof, be careful not to pull on the drain tube.
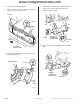
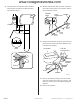
31. Secure the antenna cable to the vehicle harness
with a wire tie. Secure the wire tie between the
vehicle harness branching points.
6D01281T
VEHICLE
HARNESS
WIRE TIE
ANTENNA
CABLE
BRANCHING
POINTS
6D01123T
VEHICLE
BRACKET
CONTROL UNIT
BRACKET
FRONT
FLANGE
NUT
VEHICLE
BRACKET
www.collegehillshonda.com