
Product Manual


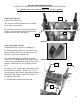
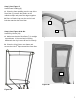

Step 4; See Figure 4:
A. Attach the Horizontal Bow (6) and the Front Posts (5) to the Brackets (2 & 3) using two 1/4" x 3/4"
bolts and locknuts (refer to detail A).
B. Position the Front Posts on the inside of the assembly, the mounting tabs on the Horizontal Bow
in the middle and the Brackets on the outside.
C. Be sure the tops on the Front Posts point toward each other.
D. Keep the bolt heads on the outside of the frame. Do not tighten the bolts at this time.
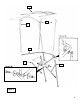
Step 5; See Figure 4:
A. Mount each leg of the Rear Vertical Bow (7) to the Brackets and the Horizontal Bow using a 1/4 x
1" bolt, two 1/4" fender washers, and a locknut (refer to detail B).
B. Be sure that the tabs on the Rear Vertical Bow are towards the front of the cab.
C. Position the bolt on the inside of the cab, with a fender washer on each side of the framework.
D. Position the Bracket on the inside of the assembly, with the Rear Vertical Bow in the middle, and
the Horizontal Bow on the outside. Do not tighten bolts at this time.
Step 6; See Figure 4:
A. Attach the Top Frame (8) to the Rear Vertical Bow and the Front Posts using four 1/4" x 5/8" bolts
and locknuts.
B. Keep the bolt heads on the outside of the frame.
C. Position the Rear Vertical Bow on the inside of the Top Frame.
D. Tighten all the bolts making sure that the Rear Vertical Bow (7) is at a 90-DEGREE angle to the
Horizontal Bow (6). The Windshield area will lean slightly forward when the frame is properly
assembled.
NOTE: This angle is critical so that the vinyl cover fits properly.
E. Tighten the Bracket to handlebar bolts from step 3 at this time.
F. Place a Plastic Cap over the end of each bolt that attaches the Rear Bow.
5