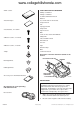
www.collegehillshonda.com Accessory INSTALLATION INSTRUCTIONS PARTS LIST Application Publications No.
www.collegehillshonda.
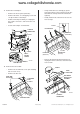
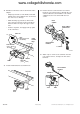
www.collegehillshonda.com 3. 5. Remove the fuel fill door release handle. Remove the left front door sill trim (three clips and three retaining tabs). RETAINING TABS Pull away the weatherstrip from the B-pillar lower trim panel. Remove the left seat belt lower anchor bolt cover and remove the lower anchor bolt. Remove the left B-pillar lower trim panel by pulling out toward you as shown.
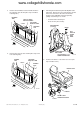
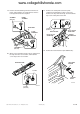
www.collegehillshonda.com 7. 9. Lift up the rear seats, and remove the rear seat under covers; • Remove the right rear seat under cover (four clips). • Remove the left rear seat under cover (five clips). Remove the rear seat belt anchor bolt and eight seat anchor bolts. • Seat belt anchor bolt torque: 30 to 35 N·m (22 to 25 lbs) LEFT REAR SEAT CUSHION RIGHT REAR SEAT CUSHION RIGHT REAR SEAT UNDER COVER 9 CLIPS 8. 8 SEAT ANCHOR BOLTS LEFT REAR SEAT UNDER COVER • 4212362T 4212342T 10.
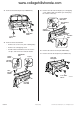
www.collegehillshonda.com 11. Remove the rear trim panel cover (eight clips and two retaining tabs). 14. Remove the left rear lower anchor bolt cover, and remove the left rear seat belt lower anchor bolt. • 2 RETAINING TABS Seat belt anchor bolt torque: 30 to 35 N·m (22 to 25 lbs) REAR TRIM PANEL COVER CLIP 6 CLIPS 2 CLIPS LEFT REAR LOWER ANCHOR BOLT COVER CLIPS LEFT REAR SEAT BELT LOWER ANCHOR BOLT 4212381T 12.
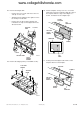
www.collegehillshonda.com 17. Remove the rear bumper: • Remove the license plate (two bolts). • Remove two bolts, six self-tapping screws and six clips from the rear bumper. • Pull the rear bumper toward you. Unplug the two vehicle connectors, and remove the rear bumper. • Set the rear bumper on the blanket. • Using a KTC trim tool, carefully pry up the front of the trim to release the three front clips. Start with the left clip and work towards the right clip.
www.collegehillshonda.com 19. Remove and discard the grommets from the roof panel, and install the six oval grommets and one round grommet into the roof panel. GROMMET (Discard.) 21. Remove the left C-pillar outer trim (slide rearward, and unplug the vehicle connector). Remove the clips from the body, and reinstall the clips to the left C-pillar outer trim. ROUND GROMMET 3 CLIPS (Install.) ROOF PANEL 3 CLIPS (Remove.
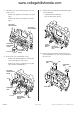
www.collegehillshonda.com 23. Remove the front bed panel (six TORX bolts). 25. Remove the left lower bed light (one self-tapping screw, pull the light out towards you and unplug the vehicle connector). LEFT LOWER BED LIGHT SELF-TAPPING SCREW CLIP VEHICLE CONNECTOR FRONT BED PANEL 6 T40 TORX BOLTS LEFT REAR ANCHOR T50 TORX BOLT 3929032H 24. Remove the left bed rail trim: • Remove the screw cover (four retaining tabs). • Remove the self-tapping screw.
www.collegehillshonda.com 28. Remove the tailgate trim: 30. Get the template. Using a scissors, cut out the marked area from the template. Align the edge of the template with the edge of the tailgate as shown, and attach it to the tailgate tape. • Remove the four screws and release the one end clip on each side. • Sharply push the tailgate to the right to release the 16 clips from the trim.
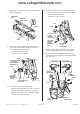
www.collegehillshonda.com 32. Drill three 8 mm holes and one 10 mm hole in the tailgate. • Wrap tape around a 3 mm drill bit, and 8 mm drill bit and a 10 mm drill bit 10 to 15 mm from the end or use a drill stop. • While wearing eye protection, drill a 3 mm hole, then an 8 mm hole in all four locations. Drill a 10 mm hole only in the upper center hole. • Remove any burrs, and apply touch-up paint to all of the holes. 34. Remove the four screws from the rear camera.
www.collegehillshonda.com 36. Route the rear camera harness through the 10 mm hole in the tailgate, and seat the grommet into the 10 mm hole. 38. Align the two locating tabs on the rear camera subbracket with the slots in the rear camera bracket, and install two 4 x 6 mm washer-screws. NOTE: Make sure the flat surface of the rear camera subbracket is facing up: otherwise, the camera view will be upside down.
www.collegehillshonda.com 39. Install clear adhesive tapes to the tailgate: 40. Route the rear camera harness along the tailgate as shown. • Open the tailgate. • Get the clear adhesive tapes. Using scissors, cut 30 mm from the end of each adhesive tape. • Using isopropyl alcohol on a shop towel, clean the tailgate where the adhesive tapes will attach. REAR CAMERA HARNESS TAILGATE REAR TAILGATE 4708092K 41.
www.collegehillshonda.com 42. Secure the rear camera harness to the harness clamp bracket B with three small wire ties. Attach the wire tie over the tape attached to the harness. HARNESS CLAMP BRACKET B 45. Pull the rear camera harness out from the inside of the tailgate, and secure the rear camera harness to the harness clamp bracket A with one small wire tie.
www.collegehillshonda.com 51. Route the rear camera harness out through the bed panel hole, and secure the rear camera harness to the vehicle harness with one wire tie just inside the panel hole. 48. Secure the rear camera harness to the tailgate with five wire ties with clip. TAILGATE 5 WIRE TIES WITH CLIP BED PANEL HOLE TAILGATE REAR REAR CAMERA HARNESS WIRE TIE FRONT VEHICLE HARNESS CUSHION TAPE (Cut in half.) REAR CAMERA HARNESS 4708103K 49.
www.collegehillshonda.com 53. Remove the vehicle grommet from the left C-pillar. 56. Inside the passenger’s compartment turn down the rear panel insulator. Pull the rear camera harness out from the hole in the C-pillar, and remove the tape and wire from the rear camera harness.
www.collegehillshonda.com 60. Continue routing the rear camera subharness forward along the vehicle harness, and secure the subharness to the vehicle harness with four small wire ties. 62. Plug the rear camera subharness 6-pin connector into the Navi control unit. NAVI CONTROL UNIT DRIVER’S SEAT VEHICLE HARNESS REAR CAMERA SUBHARNESS REAR CAMERA SUB HARNESS 6-PIN CONNECTOR FRONT 4713030K 63.
www.collegehillshonda.com 64. Reconnect the negative cable to the battery. Turn the key to the ON (II) position, and enter the Navi code. 68. Measure and mark the rear bumper at the location shown. 2 4 x 6 mm WASHER SCREWS REAR BUMPER REAR CAMERA Adjust the angle. REAR CAMERA TRIM 10 mm 15 mm 3 mm 4N15011K REAR CAMERA BRACKET 69. Using a utility knife, cut and remove measured piece from the rear bumper. Remove any burrs from the cut area with a file. 5D10060T 4 x 10 mm SOCKET BOLTS 70.